Building custom layout in SwiftUI. Basics.
Nowadays, SwiftUI provides the Layout protocol allowing us to build super-custom layouts by digging into the layout system without using GeometryReader. Layout protocol brings us the incredible power of building and reusing any layout you can imagine. This week we will learn how to use the new Layout protocol to build a flow layout in SwiftUI.
Compare designs, show rulers, add a grid, quick actions for recent builds. Create recordings with touches & audio, trim and export them into MP4 or GIF and share them anywhere using drag & drop. Add bezels to screenshots and videos. Try now
Any layout you want to build must conform to the new Layout protocol. It has two required functions to implement.
@available(iOS 16.0, macOS 13.0, tvOS 16.0, watchOS 9.0, *)
public protocol Layout : Animatable {
    func sizeThatFits(
        proposal: ProposedViewSize,
        subviews: Subviews,
        cache: inout Self.Cache
    ) -> CGSize

    func placeSubviews(
        in bounds: CGRect,
        proposal: ProposedViewSize,
        subviews: Subviews,
        cache: inout Self.Cache
    )
}
- sizeThatFits function must calculate and return the final size of your layout.
- placeSubviews function should place the subviews according to your layout rules.
Today we will start learning the Layout protocol by implementing flow layout in SwiftUI. Flow layout usually behaves like HStack, but it drops the line as soon as the views fill the horizontally available space.
Let’s start with calculating the final size of our flow layout. It should iterate over all the subviews and sum the width of the views until we have space horizontally available. As soon as we reach the end of the available space, we should drop the placement line below and continue to place views from the leading edge.
struct FlowLayout: Layout {
    func sizeThatFits(proposal: ProposedViewSize, subviews: Subviews, cache: inout ()) -> CGSize {
        let sizes = subviews.map { $0.sizeThatFits(.unspecified) }

        var totalHeight: CGFloat = 0
        var totalWidth: CGFloat = 0

        var lineWidth: CGFloat = 0
        var lineHeight: CGFloat = 0

          for size in sizes {
            if lineWidth + size.width > proposal.width ?? 0 {
                totalHeight += lineHeight
                lineWidth = size.width
                lineHeight = size.height
            } else {
                lineWidth += size.width
                lineHeight = max(lineHeight, size.height)
            }

            totalWidth = max(totalWidth, lineWidth)
        }

        totalHeight += lineHeight

        return .init(width: totalWidth, height: totalHeight)
    }
}
In the example above, we have the implementation of the sizeThatFits function. This function provides a few interesting parameters that we will use to calculate the final size of our layout. The first one is the ProposedViewSize providing us with the size the parent proposes. The second one is the instance of type Subviews which is a proxy instance for the collection of subviews allowing us to place and measure the size of the views.
We use the instance of the Subviews proxy to iterate over all the children and calculate their ideal sizes using the sizeThatFits function. It accepts a parameter allowing us to get its minimal, maximal, and ideal dimensions. In the example above, we use an unspecified parameter which means ideal size. But you can also use zero and infinity instances to get their minimal and maximal size accordingly.
After calculating the ideal sizes for all the views, we go over them to calculate the total width and height of the final layout. We use the ProposedViewSize parameter to understand the width that the parent view provides us to know when we need to drop the line of the flow layout.
Finally, we construct and return the final size of the flow layout using all the knowledge that SwiftUI’s layout system provides us. Now we can move to the implementation details of the placeSubviews function.
struct FlowLayout: Layout {
    func placeSubviews(in bounds: CGRect, proposal: ProposedViewSize, subviews: Subviews, cache: inout ()) {
        let sizes = subviews.map { $0.sizeThatFits(.unspecified) }

        var lineX = bounds.minX
        var lineY = bounds.minY
        var lineHeight: CGFloat = 0

        for index in subviews.indices {
            if lineX + sizes[index].width > (proposal.width ?? 0) {
                lineY += lineHeight
                lineHeight = 0
                lineX = bounds.minX
            }

            subviews[index].place(
                at: .init(
                    x: lineX + sizes[index].width / 2,
                    y: lineY + sizes[index].height / 2
                ),
                anchor: .center,
                proposal: ProposedViewSize(sizes[index])
            )

            lineHeight = max(lineHeight, sizes[index].height)
            lineX += sizes[index].width
        }
    }
}
As you can see in the example above, the placeSubviews function has the same set of parameters we had in the sizeThatFits but also provides us with the bounds rectangle. The bounds rectangle is the place in the view hierarchy we will fill with our subviews. Please don’t assume that it has zero origin because it can be placed anywhere on the screen, and you should use the minX, minY, maxX, maxY, midX, midY properties to put your views ideally.
Subviews type allows us to access the view proxy by index and use its place function to put the view into a specific position. It also allows us to move the view’s anchor point according to the position we pass.
struct ContentView: View {
    var body: some View {
        FlowLayout {
            ForEach(0..<5) { _ in
                Group {
                    Text("Hello")
                        .font(.largeTitle)
                    Text("World")
                        .font(.title)
                    Text("!!!")
                        .font(.title3)
                }
                .border(Color.red)
            }
        }
    }
}
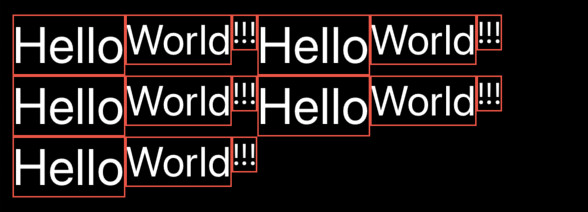
Today we learned the Layout protocol’s basics and built an elementary version of the flow layout. We will continue digging into the Layout protocol in the following posts to create more flexible configurations. Feel free to follow me on Twitter and ask your questions related to this post. Thanks for reading, and see you next week!