<?xml version="1.0" encoding="utf-8"?><feed xmlns="http://www.w3.org/2005/Atom" ><generator uri="https://jekyllrb.com/" version="3.10.0">Jekyll</generator><link href="https://swiftwithmajid.com/feed.xml" rel="self" type="application/atom+xml" /><link href="https://swiftwithmajid.com/" rel="alternate" type="text/html" /><updated>2026-04-06T14:46:30+00:00</updated><id>https://swiftwithmajid.com/feed.xml</id><title type="html">Swift with Majid</title><subtitle>Majid&apos;s blog about Swift development</subtitle><author><name>Majid Jabrayilov</name><email>cmecid@gmail.com</email></author><entry><title type="html">Building List replacement in SwiftUI</title><link href="https://swiftwithmajid.com/2026/04/06/building-list-replacement-in-swiftui/" rel="alternate" type="text/html" title="Building List replacement in SwiftUI" /><published>2026-04-06T00:00:00+00:00</published><updated>2026-04-06T00:00:00+00:00</updated><id>https://swiftwithmajid.com/2026/04/06/building-list-replacement-in-swiftui</id><content type="html" xml:base="https://swiftwithmajid.com/2026/04/06/building-list-replacement-in-swiftui/"><![CDATA[<p>Whenever you consider creating a scrollable screen in SwiftUI, you might think of using a <em>List</em>. However, it’s not always the best choice. Lists are great for displaying uniform data. For anything else, a <em>ScrollView</em> with a lazy stack is almost always the best option. This week, we will learn how to build a custom scrollable container in SwiftUI with precise control of look and feel.</p>

<p>First of all, I should mention that over the last few years SwiftUI has significantly improved the performance of <em>ScrollView</em> in pairs with lazy stacks. So, if you are not displaying hundreds of thousands of uniform data like mailboxes or to-do lists, the <em>ScrollView</em> is a way to go.</p>

<p><img src="/public/design-system.jpeg" alt="cardiobot-new-design" /></p>

<p>
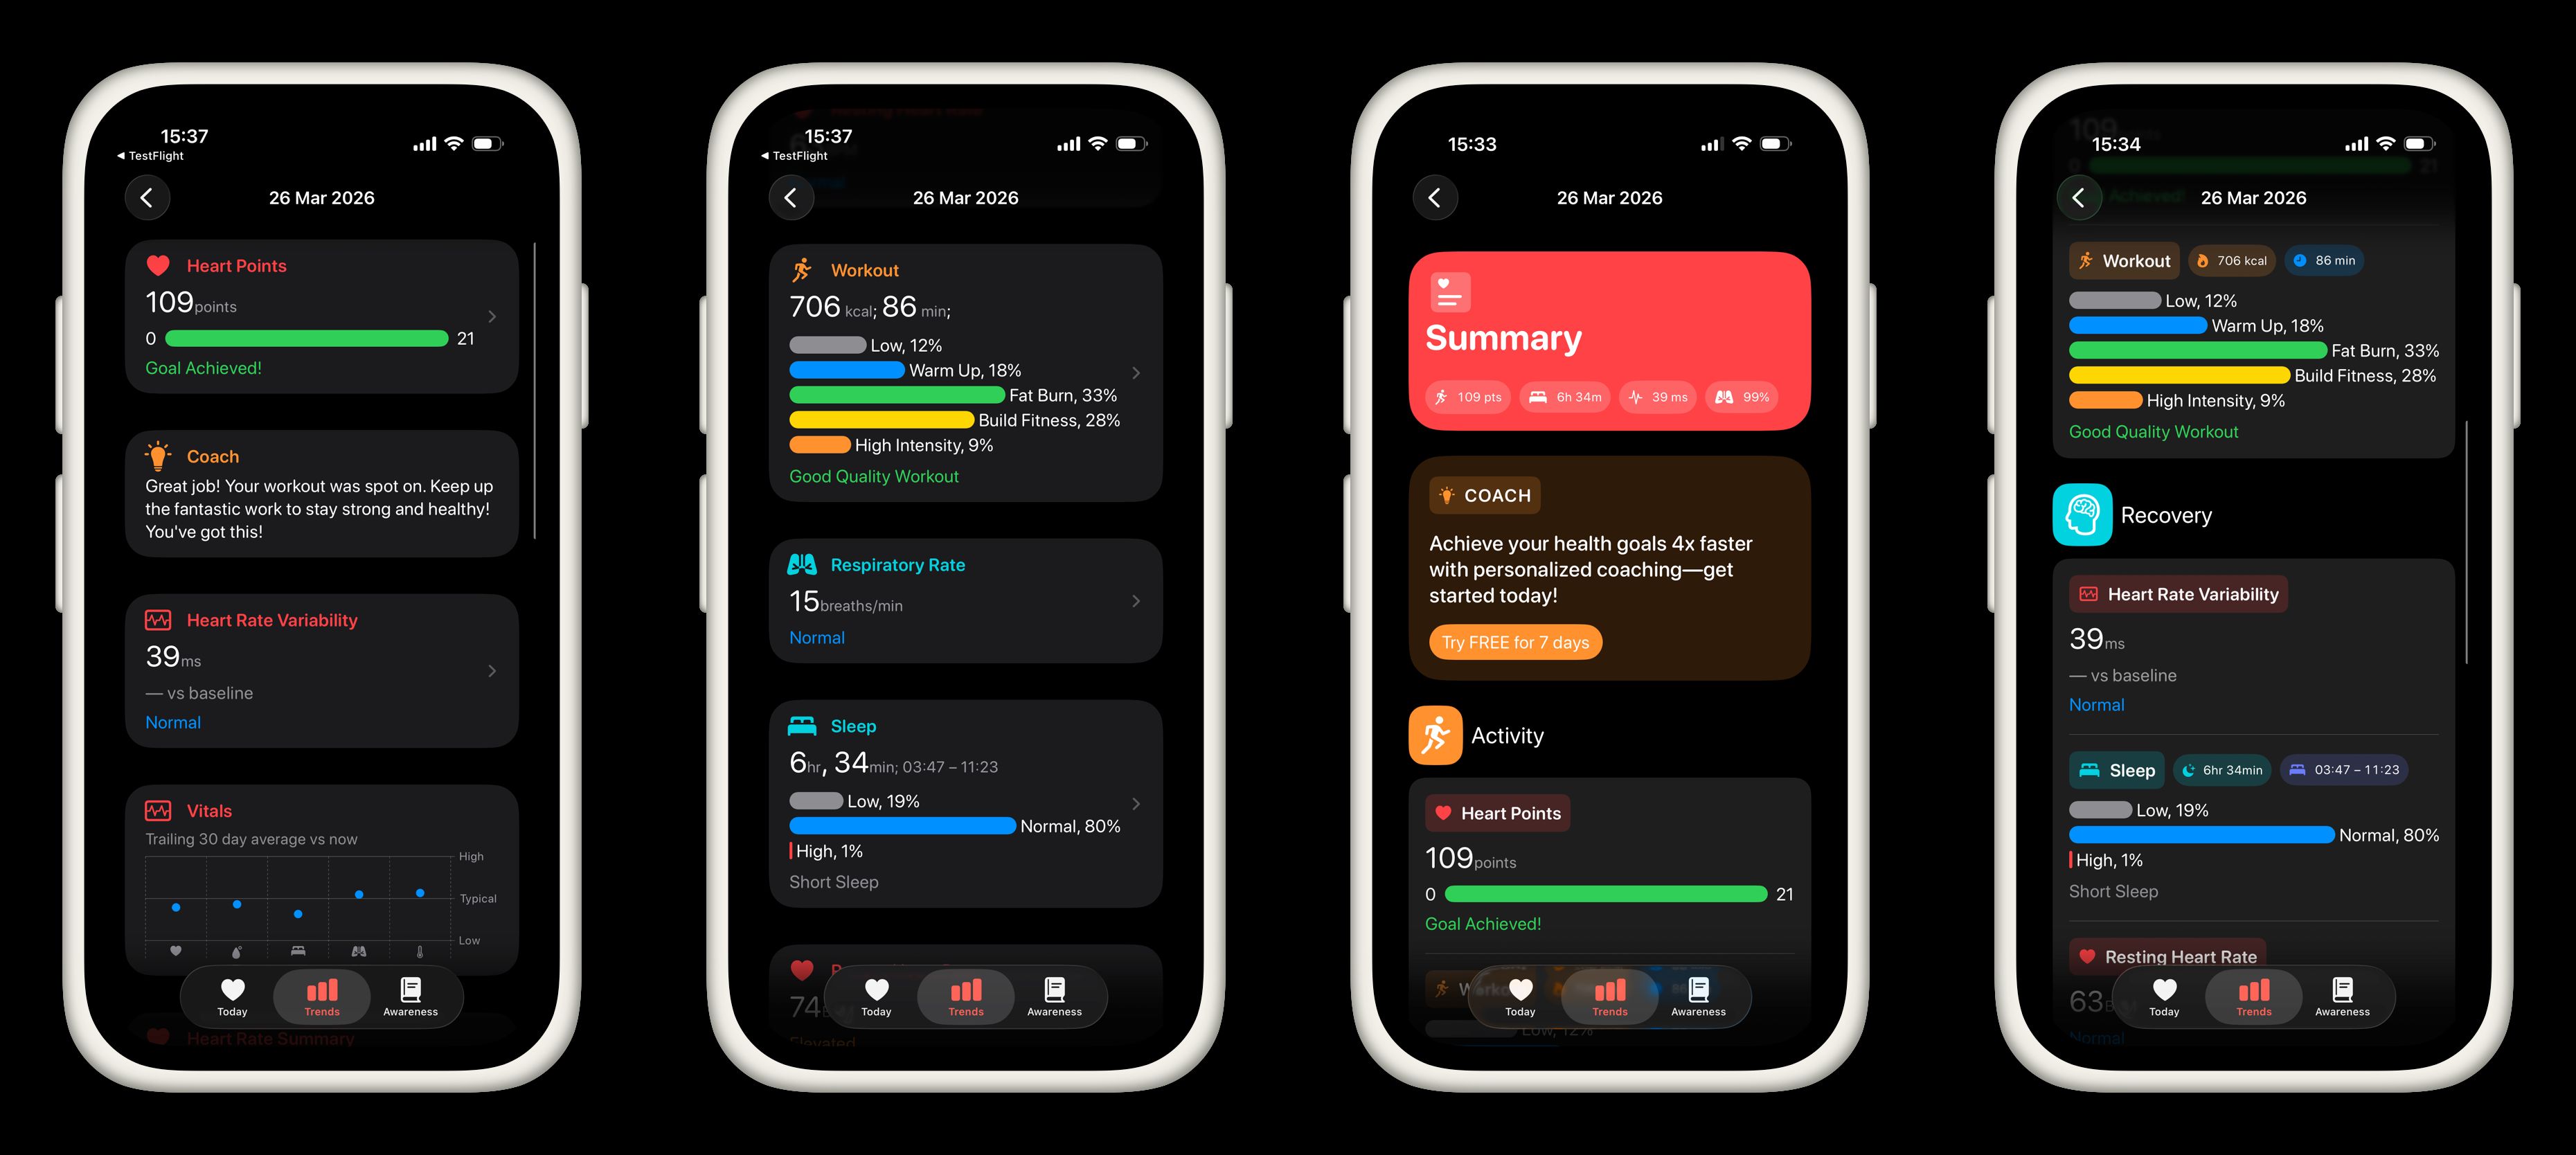
You can see 4 screenshots here. The first two of them represent the current state of my <a href="https://apps.apple.com/us/app/cardiobot-heart-rate-monitor/id1149412984?uo=4">CardioBot</a> app. The next two screenshots are the result I want to achieve. As you might notice, I use a standard <em>List</em> at the very moment, and I really like how the app looks and feels now. But I’ve decided to reconsider my UI. I want to keep it simple and recognizable for iPhone users, but I would like to make the UI more fancy.</p>

<p>As you can see, my app displays different health metrics. It is not a uniform data set, and it doesn’t make any sense to use the <em>List</em> for recycling cells. I use multiple card types like <em>HeroCard</em>, <em>TintedCard</em>, and <em>RegularCard</em>. I can achieve a similar look and feel using List and list-specific view modifiers like <em>listRowBackground</em>, <em>listItemTint</em>, and <em>listRowInsets</em>. Unfortunately, these list-specific view modifiers don’t work outside of the <em>List</em> view, which requires additional styling outside the <em>List</em>.</p>

<p>Fortunately, SwiftUI introduced Container View APIs that we can use to build a List-replacement. Container View APIs allow us to decompose SwiftUI views, apply some changes, and compose again. So, we can use the Container View APIs to build reusable container views like <em>List</em>, <em>Form</em>, or anything super custom.</p>

<div class="language-swift highlighter-rouge"><div class="highlight"><pre class="highlight"><code><span class="kd">public</span> <span class="kd">struct</span> <span class="kt">ScrollingSurface</span><span class="o">&lt;</span><span class="kt">Content</span><span class="p">:</span> <span class="kt">View</span><span class="o">&gt;</span><span class="p">:</span> <span class="kt">View</span> <span class="p">{</span>
    <span class="kd">public</span> <span class="kd">enum</span> <span class="kt">Direction</span> <span class="p">{</span>
        <span class="k">case</span> <span class="nf">vertical</span><span class="p">(</span><span class="kt">HorizontalAlignment</span><span class="p">)</span>
        <span class="k">case</span> <span class="nf">horizontal</span><span class="p">(</span><span class="kt">VerticalAlignment</span><span class="p">)</span>
    <span class="p">}</span>

    <span class="k">let</span> <span class="nv">direction</span><span class="p">:</span> <span class="kt">Direction</span>
    <span class="k">let</span> <span class="nv">spacing</span><span class="p">:</span> <span class="kt">CGFloat</span><span class="p">?</span>
    <span class="k">let</span> <span class="nv">content</span><span class="p">:</span> <span class="kt">Content</span>

    <span class="kd">public</span> <span class="nf">init</span><span class="p">(</span>
        <span class="n">_</span> <span class="nv">direction</span><span class="p">:</span> <span class="kt">Direction</span> <span class="o">=</span> <span class="o">.</span><span class="nf">vertical</span><span class="p">(</span><span class="o">.</span><span class="n">leading</span><span class="p">),</span>
        <span class="nv">spacing</span><span class="p">:</span> <span class="kt">CGFloat</span><span class="p">?</span> <span class="o">=</span> <span class="kc">nil</span><span class="p">,</span>
        <span class="kd">@ViewBuilder</span> <span class="nv">content</span><span class="p">:</span> <span class="p">()</span> <span class="o">-&gt;</span> <span class="kt">Content</span>
    <span class="p">)</span> <span class="p">{</span>
        <span class="k">self</span><span class="o">.</span><span class="n">spacing</span> <span class="o">=</span> <span class="n">spacing</span>
        <span class="k">self</span><span class="o">.</span><span class="n">direction</span> <span class="o">=</span> <span class="n">direction</span>
        <span class="k">self</span><span class="o">.</span><span class="n">content</span> <span class="o">=</span> <span class="nf">content</span><span class="p">()</span>
    <span class="p">}</span>

    <span class="kd">public</span> <span class="k">var</span> <span class="nv">body</span><span class="p">:</span> <span class="kd">some</span> <span class="kt">View</span> <span class="p">{</span>
        <span class="k">switch</span> <span class="n">direction</span> <span class="p">{</span>
        <span class="k">case</span> <span class="o">.</span><span class="nf">horizontal</span><span class="p">(</span><span class="k">let</span> <span class="nv">alignment</span><span class="p">):</span>
            <span class="kt">ScrollView</span><span class="p">(</span><span class="o">.</span><span class="n">horizontal</span><span class="p">)</span> <span class="p">{</span>
                <span class="kt">LazyHStack</span><span class="p">(</span><span class="nv">alignment</span><span class="p">:</span> <span class="n">alignment</span><span class="p">,</span> <span class="nv">spacing</span><span class="p">:</span> <span class="n">spacing</span><span class="p">)</span> <span class="p">{</span>
                    <span class="n">content</span>
                <span class="p">}</span>
                <span class="o">.</span><span class="nf">scrollTargetLayout</span><span class="p">()</span>
                <span class="o">.</span><span class="nf">padding</span><span class="p">()</span>
            <span class="p">}</span>
        <span class="k">case</span> <span class="o">.</span><span class="nf">vertical</span><span class="p">(</span><span class="k">let</span> <span class="nv">alignment</span><span class="p">):</span>
            <span class="kt">ScrollView</span><span class="p">(</span><span class="o">.</span><span class="n">vertical</span><span class="p">)</span> <span class="p">{</span>
                <span class="kt">LazyVStack</span><span class="p">(</span><span class="nv">alignment</span><span class="p">:</span> <span class="n">alignment</span><span class="p">,</span> <span class="nv">spacing</span><span class="p">:</span> <span class="n">spacing</span><span class="p">)</span> <span class="p">{</span>
                    <span class="n">content</span>
                <span class="p">}</span>
                <span class="o">.</span><span class="nf">scrollTargetLayout</span><span class="p">()</span>
                <span class="o">.</span><span class="nf">padding</span><span class="p">()</span>
            <span class="p">}</span>
        <span class="p">}</span>
    <span class="p">}</span>
<span class="p">}</span>
</code></pre></div></div>

<p>Every screen in my app uses <em>ScrollView</em> with a lazy stack. So, I’ve created the <em>ScrollingSurface</em> type. As you can see, it is a simple wrapper around the <em>ScrollView</em> and <em>LazyVStack</em> or <em>LazyHStack</em> depending on the chosen direction. I will use the <em>ScrollingSurface</em> type as the root view on every screen of my app.</p>

<div class="language-swift highlighter-rouge"><div class="highlight"><pre class="highlight"><code><span class="kd">public</span> <span class="kd">struct</span> <span class="kt">DividedCard</span><span class="o">&lt;</span><span class="kt">Content</span><span class="p">:</span> <span class="kt">View</span><span class="o">&gt;</span><span class="p">:</span> <span class="kt">View</span> <span class="p">{</span>
    <span class="k">let</span> <span class="nv">content</span><span class="p">:</span> <span class="kt">Content</span>

    <span class="kd">public</span> <span class="nf">init</span><span class="p">(</span><span class="kd">@ViewBuilder</span> <span class="nv">content</span><span class="p">:</span> <span class="p">()</span> <span class="o">-&gt;</span> <span class="kt">Content</span><span class="p">)</span> <span class="p">{</span>
        <span class="k">self</span><span class="o">.</span><span class="n">content</span> <span class="o">=</span> <span class="nf">content</span><span class="p">()</span>
    <span class="p">}</span>

    <span class="kd">public</span> <span class="k">var</span> <span class="nv">body</span><span class="p">:</span> <span class="kd">some</span> <span class="kt">View</span> <span class="p">{</span>
        <span class="kt">Group</span><span class="p">(</span><span class="nv">subviews</span><span class="p">:</span> <span class="n">content</span><span class="p">)</span> <span class="p">{</span> <span class="n">subviews</span> <span class="k">in</span>
            <span class="k">if</span> <span class="o">!</span><span class="n">subviews</span><span class="o">.</span><span class="n">isEmpty</span> <span class="p">{</span>
                <span class="kt">VStack</span><span class="p">(</span><span class="nv">alignment</span><span class="p">:</span> <span class="o">.</span><span class="n">leading</span><span class="p">)</span> <span class="p">{</span>
                    <span class="kt">ForEach</span><span class="p">(</span><span class="n">subviews</span><span class="p">)</span> <span class="p">{</span> <span class="n">subview</span> <span class="k">in</span>
                        <span class="n">subview</span>

                        <span class="k">if</span> <span class="n">subviews</span><span class="o">.</span><span class="n">last</span><span class="p">?</span><span class="o">.</span><span class="n">id</span> <span class="o">!=</span> <span class="n">subview</span><span class="o">.</span><span class="n">id</span> <span class="p">{</span>
                            <span class="kt">Divider</span><span class="p">()</span>
                                <span class="o">.</span><span class="nf">padding</span><span class="p">(</span><span class="o">.</span><span class="n">vertical</span><span class="p">,</span> <span class="mi">8</span><span class="p">)</span>
                        <span class="p">}</span>
                    <span class="p">}</span>
                <span class="p">}</span>
                <span class="o">.</span><span class="nf">padding</span><span class="p">()</span>
                <span class="o">.</span><span class="nf">frame</span><span class="p">(</span><span class="nv">maxWidth</span><span class="p">:</span> <span class="o">.</span><span class="n">infinity</span><span class="p">,</span> <span class="nv">alignment</span><span class="p">:</span> <span class="o">.</span><span class="n">topLeading</span><span class="p">)</span>
                <span class="o">.</span><span class="nf">background</span><span class="p">(</span><span class="o">.</span><span class="n">regularMaterial</span><span class="p">,</span> <span class="nv">in</span><span class="p">:</span> <span class="kt">RoundedRectangle</span><span class="p">(</span><span class="nv">cornerRadius</span><span class="p">:</span> <span class="mi">32</span><span class="p">))</span>
            <span class="p">}</span>
        <span class="p">}</span>
    <span class="p">}</span>
<span class="p">}</span>
</code></pre></div></div>

<p>Next most important primitive for UI is the <em>DividedCard</em> type. As you can see, it uses <strong>Group(subviews:)</strong> which is a part of SwiftUI Container View API. This initializer of the <em>Group</em> type allows us to decompose the view passed with a <em>ViewBuilder</em> closure.</p>

<blockquote>
  <p>To learn more about Container View APIs in SwiftUI, take a look at my dedicated <a href="https://swiftwithmajid.com/2024/09/24/mastering-container-views-in-swiftui-basics/">“Mastering container views in SwiftUI. Basics.”</a> post.</p>
</blockquote>

<p>In the <em>DividedCard</em> view, we decompose the passed view and add the divider after each child view. In the end, we wrap the whole view with a background with rounded corners to make it feel like a card.</p>

<div class="language-swift highlighter-rouge"><div class="highlight"><pre class="highlight"><code><span class="kd">public</span> <span class="kd">struct</span> <span class="kt">SectionedSurface</span><span class="o">&lt;</span><span class="kt">Content</span><span class="p">:</span> <span class="kt">View</span><span class="o">&gt;</span><span class="p">:</span> <span class="kt">View</span> <span class="p">{</span>
    <span class="k">let</span> <span class="nv">content</span><span class="p">:</span> <span class="kt">Content</span>

    <span class="kd">public</span> <span class="nf">init</span><span class="p">(</span><span class="kd">@ViewBuilder</span> <span class="nv">content</span><span class="p">:</span> <span class="p">()</span> <span class="o">-&gt;</span> <span class="kt">Content</span><span class="p">)</span> <span class="p">{</span>
        <span class="k">self</span><span class="o">.</span><span class="n">content</span> <span class="o">=</span> <span class="nf">content</span><span class="p">()</span>
    <span class="p">}</span>

    <span class="kd">public</span> <span class="k">var</span> <span class="nv">body</span><span class="p">:</span> <span class="kd">some</span> <span class="kt">View</span> <span class="p">{</span>
        <span class="kt">ForEach</span><span class="p">(</span><span class="nv">sections</span><span class="p">:</span> <span class="n">content</span><span class="p">)</span> <span class="p">{</span> <span class="n">section</span> <span class="k">in</span>
            <span class="k">if</span> <span class="o">!</span><span class="n">section</span><span class="o">.</span><span class="n">content</span><span class="o">.</span><span class="n">isEmpty</span> <span class="p">{</span>
                <span class="n">section</span><span class="o">.</span><span class="n">header</span><span class="o">.</span><span class="nf">padding</span><span class="p">(</span><span class="o">.</span><span class="n">top</span><span class="p">)</span>
                <span class="n">section</span><span class="o">.</span><span class="n">content</span>
                <span class="n">section</span><span class="o">.</span><span class="n">footer</span>
            <span class="p">}</span>
        <span class="p">}</span>
    <span class="p">}</span>
<span class="p">}</span>
</code></pre></div></div>

<p>Another interesting UI primitive I built is the <em>SectionedSurface</em>. It uses <strong>ForEach(sections:)</strong> which allows us to extract all the sections from the passed view and filter out the sections without content and add some paddings to section headers.</p>

<div class="language-swift highlighter-rouge"><div class="highlight"><pre class="highlight"><code><span class="kd">public</span> <span class="kd">struct</span> <span class="kt">NavigationButtonStyle</span><span class="p">:</span> <span class="kt">ButtonStyle</span> <span class="p">{</span>
    <span class="kd">public</span> <span class="kd">func</span> <span class="nf">makeBody</span><span class="p">(</span><span class="nv">configuration</span><span class="p">:</span> <span class="kt">Configuration</span><span class="p">)</span> <span class="o">-&gt;</span> <span class="kd">some</span> <span class="kt">View</span> <span class="p">{</span>
        <span class="kt">HStack</span> <span class="p">{</span>
            <span class="n">configuration</span><span class="o">.</span><span class="n">label</span>
                <span class="o">.</span><span class="nf">opacity</span><span class="p">(</span><span class="n">configuration</span><span class="o">.</span><span class="n">isPressed</span> <span class="p">?</span> <span class="mf">0.7</span> <span class="p">:</span> <span class="mi">1</span><span class="p">)</span>
            <span class="kt">Spacer</span><span class="p">()</span>
            <span class="kt">Image</span><span class="p">(</span><span class="nv">systemName</span><span class="p">:</span> <span class="s">"chevron.right"</span><span class="p">)</span>
                <span class="o">.</span><span class="nf">foregroundStyle</span><span class="p">(</span><span class="o">.</span><span class="n">tertiary</span><span class="p">)</span>
        <span class="p">}</span>
        <span class="o">.</span><span class="nf">contentShape</span><span class="p">(</span><span class="o">.</span><span class="n">rect</span><span class="p">)</span>
    <span class="p">}</span>
<span class="p">}</span>

<span class="kd">extension</span> <span class="kt">ButtonStyle</span> <span class="k">where</span> <span class="k">Self</span> <span class="o">==</span> <span class="kt">NavigationButtonStyle</span> <span class="p">{</span>
    <span class="kd">public</span> <span class="kd">static</span> <span class="k">var</span> <span class="nv">navigation</span><span class="p">:</span> <span class="k">Self</span> <span class="p">{</span> <span class="o">.</span><span class="nf">init</span><span class="p">()</span> <span class="p">}</span>
<span class="p">}</span>
</code></pre></div></div>

<p>One thing you can miss from using <em>List</em> view in SwiftUI is the styling of a <em>NavigationLink</em>. <em>List</em> automatically adds the chevron on the trailing edge of a <em>NavigationLink</em>. Fortunately, we can achieve that using a custom button style.</p>

<div class="language-swift highlighter-rouge"><div class="highlight"><pre class="highlight"><code><span class="kd">public</span> <span class="kd">struct</span> <span class="kt">SummaryView</span><span class="p">:</span> <span class="kt">View</span> <span class="p">{</span>
    <span class="k">let</span> <span class="nv">summary</span><span class="p">:</span> <span class="kt">SummaryStore</span>
    
    <span class="kd">public</span> <span class="k">var</span> <span class="nv">body</span><span class="p">:</span> <span class="kd">some</span> <span class="kt">View</span> <span class="p">{</span>
        <span class="kt">ScrollingSurface</span> <span class="p">{</span>
            <span class="kt">SectionedSurface</span> <span class="p">{</span>
                <span class="n">coachSection</span>
                <span class="n">activitySection</span>
                <span class="n">recoverySection</span>
                <span class="n">vitalsSection</span>
                <span class="n">heartRateSection</span>
                <span class="n">alcoholicBeveragesSection</span>
            <span class="p">}</span>
        <span class="p">}</span>
        <span class="o">.</span><span class="nf">buttonStyle</span><span class="p">(</span><span class="o">.</span><span class="n">navigation</span><span class="p">)</span>
    <span class="p">}</span>
    
    <span class="kd">@ViewBuilder</span> <span class="kd">private</span> <span class="k">var</span> <span class="nv">activitySection</span><span class="p">:</span> <span class="kd">some</span> <span class="kt">View</span> <span class="p">{</span>
        <span class="kt">Section</span> <span class="p">{</span>
            <span class="k">if</span> <span class="o">!</span><span class="n">summary</span><span class="o">.</span><span class="n">metrics</span><span class="o">.</span><span class="n">workouts</span><span class="o">.</span><span class="n">isEmpty</span> <span class="p">{</span>
                <span class="kt">DividedCard</span> <span class="p">{</span>
                    <span class="kt">ForEach</span><span class="p">(</span><span class="n">summary</span><span class="o">.</span><span class="n">metrics</span><span class="o">.</span><span class="n">workouts</span><span class="p">,</span> <span class="nv">id</span><span class="p">:</span> <span class="p">\</span><span class="o">.</span><span class="n">workout</span><span class="o">.</span><span class="n">uuid</span><span class="p">)</span> <span class="p">{</span> <span class="n">snapshot</span> <span class="k">in</span>
                        <span class="kt">NavigationLink</span> <span class="p">{</span>
                            <span class="kt">WorkoutDetailsView</span><span class="p">(</span><span class="nv">snapshot</span><span class="p">:</span> <span class="n">snapshot</span><span class="p">)</span>
                        <span class="p">}</span> <span class="nv">label</span><span class="p">:</span> <span class="p">{</span>
                            <span class="kt">WorkoutView</span><span class="p">(</span><span class="nv">snapshot</span><span class="p">:</span> <span class="n">snapshot</span><span class="p">)</span>
                        <span class="p">}</span>
                    <span class="p">}</span>
                <span class="p">}</span>
            <span class="p">}</span>
        <span class="p">}</span> <span class="nv">header</span><span class="p">:</span> <span class="p">{</span>
            <span class="kt">SectionHeader</span><span class="p">(</span>
                <span class="o">.</span><span class="n">horizontal</span><span class="p">,</span>
                <span class="nv">title</span><span class="p">:</span> <span class="kt">Text</span><span class="p">(</span><span class="s">"activitySection"</span><span class="p">),</span>
                <span class="nv">systemImage</span><span class="p">:</span> <span class="s">"figure.run"</span>
            <span class="p">)</span>
            <span class="o">.</span><span class="nf">tint</span><span class="p">(</span><span class="o">.</span><span class="n">orange</span><span class="p">)</span>
        <span class="p">}</span>
    <span class="p">}</span>
<span class="p">}</span>
</code></pre></div></div>

<p>Here is the code from my app showing the usage of the new UI primitives we built earlier. As you can see, we have very similar usage to the List API, but also have precise control of look and feel which allows us to reuse these primitives on screens without sections just by removing <em>SectionedSurface</em>.</p>

<p>Replacing List in SwiftUI is not about abandoning a powerful component—it’s about choosing the right tool for the job. While List remains an excellent choice for large, uniform datasets, modern SwiftUI gives us the flexibility to build something more tailored when our UI demands it.</p>

<p>By leveraging ScrollView with lazy stacks and the Container View APIs, we can recreate—and even surpass—the capabilities of <em>List</em>. Custom primitives like <em>ScrollingSurface</em>, <em>DividedCard</em>, and <em>SectionedSurface</em> demonstrate how we can compose reusable building blocks that match our product’s design language while maintaining performance and clarity. I hope you enjoy the post. Feel free to follow me on <a href="https://twitter.com/mecid">Twitter</a> and ask your questions related to this post. Thanks for reading, and see you next week!</p>]]></content><author><name>Majid Jabrayilov</name><email>cmecid@gmail.com</email></author><category term="View Composition" /><summary type="html"><![CDATA[Whenever you consider creating a scrollable screen in SwiftUI, you might think of using a List. However, it’s not always the best choice. Lists are great for displaying uniform data. For anything else, a ScrollView with a lazy stack is almost always the best option. This week, we will learn how to build a custom scrollable container in SwiftUI with precise control of look and feel.]]></summary><media:thumbnail xmlns:media="http://search.yahoo.com/mrss/" url="https://swiftwithmajid.com/public/container.png" /><media:content medium="image" url="https://swiftwithmajid.com/public/container.png" xmlns:media="http://search.yahoo.com/mrss/" /></entry><entry><title type="html">Agentic coding in Xcode</title><link href="https://swiftwithmajid.com/2026/02/10/agentic-coding-in-xcode/" rel="alternate" type="text/html" title="Agentic coding in Xcode" /><published>2026-02-10T00:00:00+00:00</published><updated>2026-02-10T00:00:00+00:00</updated><id>https://swiftwithmajid.com/2026/02/10/agentic-coding-in-xcode</id><content type="html" xml:base="https://swiftwithmajid.com/2026/02/10/agentic-coding-in-xcode/"><![CDATA[<p>Apple has finally released Xcode 26.3, which now supports agentic coding. In this article, I’ll guide you through configuring Xcode 26.3 and utilizing the latest best practices when using agentic tools for building apps on Apple platforms.</p>

<div class="friends">
    <span>
        <b>Enhancing the Xcode Simulators.</b> <br />
        Compare designs, show rulers, add a grid, quick actions for recent builds. Create recordings with touches &amp; audio, trim and export them into MP4 or GIF and share them anywhere using drag &amp; drop. Add bezels to screenshots and videos. <a href="https://gumroad.com/a/931293139/ftvbh">Try now</a>
    </span>
</div>

<p>I assume you’re familiar with agentic coding tools like Codex or Claude Code. If not, they’re computer programs that allow you to share access to your codebase and engage in conversations with it to discuss your codebase, implement features, review solutions, and more.</p>

<p>Xcode 26.3 fully supports agentic coding tools like Codex, Claude Code, or any other third-party providers. To activate these tools, you need an active subscription to one of them. You can do this by navigating to <em>Xcode -&gt; Settings -&gt; Intelligence -&gt; OpenAI -&gt; Codex</em>. A similar setup is available for Claud Code.</p>

<p>Xcode not only enables the use of agentic coding tools but also provides a Model Context Protocol (MCP). The MCP allows access to Xcode features within the agentic coding tools. For instance, a coding agent can run a preview, compare it with your design requirements, or access the latest Apple documentation.</p>

<p>Xcode 26.3 comes with bundled Codex and Claude Code instances which are a bit outdated now. But no worries, you can easily replace the bundled version of them with the recent one.</p>

<p>For instance, if you’ve already installed Codex on your working machine using <em>Brew</em> (which I highly recommend), you can create a symbolic link to the directory where Xcode stores bundled versions.</p>

<blockquote>
  <p>ln -sf $(which codex) ~/Library/Developer/Xcode/CodingAssistant/Agents/Versions/26.3/codex</p>
</blockquote>

<blockquote>
  <p>ln -sf $(which claude) ~/Library/Developer/Xcode/CodingAssistant/Agents/Versions/26.3/claude</p>
</blockquote>

<p>The same approach applies to the skills folder. Skills are reusable knowledge that you can share with your agentic coding tool. For instance, it could be a document on how to cook data flow in features or some best practices on building animations, and so on. These documents may not always be necessary in your workflow, but you might need to plug them in occasionally.</p>

<blockquote>
  <p>~/Library/Developer/Xcode/CodingAssistant/codex/skills</p>
</blockquote>

<blockquote>
  <p>~/Library/Developer/Xcode/CodingAssistant/ClaudeAgentConfig/skills</p>
</blockquote>

<p>You can create symbolic links to these folders to share your skills and have a single source of them. I highly encourage you to install skills by <a href="https://github.com/AvdLee">Antoine van der Lee</a> for SwiftUI and Swift Concurrency. It might be a game changing for you.</p>

<p>Configuration files can be adjusted to seamlessly integrate custom MCPs or tailor the default models to better align with your workflow and preferences.</p>

<blockquote>
  <p>~/Library/Developer/Xcode/CodingAssistant/codex/config.toml</p>
</blockquote>

<blockquote>
  <p>~/Library/Developer/Xcode/CodingAssistant/ClaudeAgentConfig/.claude</p>
</blockquote>

<p>Agentic coding in Xcode 26.3 isn’t just a new checkbox in Settings — it’s a shift in how we build apps on Apple platforms. When you connect tools like Codex or Claude Code directly to Xcode and unlock MCP, your editor stops being just an IDE and starts becoming a collaborative environment.</p>

<p>Your agent can reason about your codebase, access documentation, run previews, and align implementation with design intent — all within the same workflow. I hope you enjoyed this one. Feel free to follow me on <a href="https://twitter.com/mecid">Twitter</a> and ask any questions related to this post. Thanks for reading, and see you next week!</p>]]></content><author><name>Majid Jabrayilov</name><email>cmecid@gmail.com</email></author><category term="Meta" /><summary type="html"><![CDATA[Apple has finally released Xcode 26.3, which now supports agentic coding. In this article, I’ll guide you through configuring Xcode 26.3 and utilizing the latest best practices when using agentic tools for building apps on Apple platforms.]]></summary><media:thumbnail xmlns:media="http://search.yahoo.com/mrss/" url="https://swiftwithmajid.com/public/agentic-coding.jpg" /><media:content medium="image" url="https://swiftwithmajid.com/public/agentic-coding.jpg" xmlns:media="http://search.yahoo.com/mrss/" /></entry><entry><title type="html">On-demand resources in iOS app</title><link href="https://swiftwithmajid.com/2026/02/03/on-demand-resources-in-ios-app/" rel="alternate" type="text/html" title="On-demand resources in iOS app" /><published>2026-02-03T00:00:00+00:00</published><updated>2026-02-03T00:00:00+00:00</updated><id>https://swiftwithmajid.com/2026/02/03/on-demand-resources-in-ios-app</id><content type="html" xml:base="https://swiftwithmajid.com/2026/02/03/on-demand-resources-in-ios-app/"><![CDATA[<p>On-Demand Resources allow you to ship a smaller initial app download and fetch additional assets like images, sounds, level data, ML models, and more only when a user requires them. This week, we’ll explore how to utilize on-demand resources to store secrets outside of the app binary.</p>

<div class="friends">
    <span>
        <b>Enhancing the Xcode Simulators.</b> <br />
        Compare designs, show rulers, add a grid, quick actions for recent builds. Create recordings with touches &amp; audio, trim and export them into MP4 or GIF and share them anywhere using drag &amp; drop. Add bezels to screenshots and videos. <a href="https://gumroad.com/a/931293139/ftvbh">Try now</a>
    </span>
</div>

<p>iOS handles downloading, caching, and eviction, providing a seamless streaming experience without the need for your own asset CDN logic. Most apps use on-demand resources for large blobs like level data in games or ML models. But we can also leverage the power of on-demand resources to keep secrets outside of our binary.</p>

<p>For instance, we can fetch API tokens using on-demand resources and save them in the Keychain. This makes reverse engineering our app binary more challenging.</p>

<p>First, we need to enable them in the build settings of our app target. There’s a key called “Enable On Demand Resources” that should be set to YES. Once that’s done, we can start associating app resources with tags in the Resource Tags section of app target settings. This will allow us to fetch a specific collection of resources later on by using those tags.</p>

<p>There are three types of tags: initial install tags, prefetched tags, and download-only tags. Initial install tags are downloaded from the App Store along with the app binary. Prefetched tags are downloaded as soon as the app binary is downloaded. Download-only tags are downloaded only when you request them using an API.</p>

<div class="language-swift highlighter-rouge"><div class="highlight"><pre class="highlight"><code><span class="kd">final</span> <span class="kd">class</span> <span class="kt">OnDemandResource</span> <span class="p">{</span>
    <span class="kd">private</span> <span class="k">let</span> <span class="nv">request</span><span class="p">:</span> <span class="kt">NSBundleResourceRequest</span>

    <span class="nf">init</span><span class="p">(</span><span class="nv">tags</span><span class="p">:</span> <span class="kt">Set</span><span class="o">&lt;</span><span class="kt">String</span><span class="o">&gt;</span><span class="p">)</span> <span class="p">{</span>
        <span class="n">request</span> <span class="o">=</span> <span class="kt">NSBundleResourceRequest</span><span class="p">(</span><span class="nv">tags</span><span class="p">:</span> <span class="n">tags</span><span class="p">)</span>
    <span class="p">}</span>

    <span class="kd">func</span> <span class="nf">pin</span><span class="p">()</span> <span class="k">async</span> <span class="k">throws</span> <span class="o">-&gt;</span> <span class="kt">Bundle</span> <span class="p">{</span>
        <span class="k">let</span> <span class="nv">isFetched</span> <span class="o">=</span> <span class="k">await</span> <span class="n">request</span><span class="o">.</span><span class="nf">conditionallyBeginAccessingResources</span><span class="p">()</span>

        <span class="k">if</span> <span class="o">!</span><span class="n">isFetched</span> <span class="p">{</span>
            <span class="k">try</span> <span class="k">await</span> <span class="n">request</span><span class="o">.</span><span class="nf">beginAccessingResources</span><span class="p">()</span>
        <span class="p">}</span>

        <span class="k">return</span> <span class="n">request</span><span class="o">.</span><span class="n">bundle</span>
    <span class="p">}</span>

    <span class="kd">func</span> <span class="nf">unpin</span><span class="p">()</span> <span class="p">{</span>
        <span class="n">request</span><span class="o">.</span><span class="nf">endAccessingResources</span><span class="p">()</span>
    <span class="p">}</span>
<span class="p">}</span>
</code></pre></div></div>

<p>Let’s create a type that we can use to access our on-demand resources. Here we define the <em>OnDemandResource</em> class with two functions <em>pin</em> and <em>unpin</em>. The <em>pin</em> function initiates a resource request with the provided set of tags and returns a bundle that we can use to access our resources.</p>

<p>We use the <em>conditionallyBeginAccessingResources</em> function to check if we can access resources directly. If it returns false, we download them from the App Store using <em>beginAccessingResources</em>. If downloaded, it returns true, and we get the bundle to access resources almost immediately. As soon as we finish using resource we should call <em>unpin</em> to allow system evict resources.</p>

<div class="language-swift highlighter-rouge"><div class="highlight"><pre class="highlight"><code><span class="k">let</span> <span class="nv">resource</span> <span class="o">=</span> <span class="kt">OnDemandResource</span><span class="p">(</span><span class="nv">tags</span><span class="p">:</span> <span class="p">[</span><span class="s">"Config"</span><span class="p">])</span>
<span class="k">let</span> <span class="nv">bundle</span> <span class="o">=</span> <span class="k">try</span> <span class="k">await</span> <span class="n">resource</span><span class="o">.</span><span class="nf">pin</span><span class="p">()</span>
<span class="k">defer</span> <span class="p">{</span> <span class="n">resource</span><span class="o">.</span><span class="nf">unpin</span><span class="p">()</span> <span class="p">}</span>

<span class="k">if</span> <span class="k">let</span> <span class="nv">config</span> <span class="o">=</span> <span class="n">bundle</span><span class="o">.</span><span class="nf">url</span><span class="p">(</span><span class="nv">forResource</span><span class="p">:</span> <span class="s">"Config"</span><span class="p">,</span> <span class="nv">withExtension</span><span class="p">:</span> <span class="s">"json"</span><span class="p">)</span> <span class="p">{</span>
    <span class="c1">// decode your config and save to Keychain</span>
<span class="p">}</span>
</code></pre></div></div>

<p>On-demand Resources are often associated with large assets, but as we’ve seen, they can also be a practical tool for improving the security posture of your iOS app. By moving sensitive data—such as API tokens—out of the main app binary and delivering them only when needed, you reduce the attack surface and make static analysis significantly harder.</p>

<p>On-demand resources can be a useful defense-in-depth technique, but they should not be treated as a security boundary on their own. On-demand resources are not encrypted by default once downloaded to the device. A determined attacker with device access can still inspect cached resources.</p>

<p>Apple mentioned that on-demand resources is a legacy technology, so migrating to Background Assets is recommended. That’s going to be the topic for the next week. I hope you enjoyed this one. Feel free to follow me on <a href="https://twitter.com/mecid">Twitter</a> and ask any questions related to this post. Thanks for reading, and see you next week!</p>]]></content><author><name>Majid Jabrayilov</name><email>cmecid@gmail.com</email></author><category term="Architecture" /><summary type="html"><![CDATA[On-Demand Resources allow you to ship a smaller initial app download and fetch additional assets like images, sounds, level data, ML models, and more only when a user requires them. This week, we’ll explore how to utilize on-demand resources to store secrets outside of the app binary.]]></summary><media:thumbnail xmlns:media="http://search.yahoo.com/mrss/" url="https://swiftwithmajid.com/public/xcode-cloud.png" /><media:content medium="image" url="https://swiftwithmajid.com/public/xcode-cloud.png" xmlns:media="http://search.yahoo.com/mrss/" /></entry><entry><title type="html">Monitoring app performance with MetricKit</title><link href="https://swiftwithmajid.com/2025/12/09/monitoring-app-performance-with-metrickit/" rel="alternate" type="text/html" title="Monitoring app performance with MetricKit" /><published>2025-12-09T00:00:00+00:00</published><updated>2025-12-09T00:00:00+00:00</updated><id>https://swiftwithmajid.com/2025/12/09/monitoring-app-performance-with-metrickit</id><content type="html" xml:base="https://swiftwithmajid.com/2025/12/09/monitoring-app-performance-with-metrickit/"><![CDATA[<p>Xcode Organizer provides access to essential performance metrics such as crashes, energy impact, hangs, launch time, memory consumption, and app terminations. However, it lacks sufficient information to resolve certain issues, particularly app terminations. To address this, Apple introduced the MetricKit framework, enabling us to collect comprehensive diagnostics and build a detailed performance dashboard.</p>

<div class="friends">
    <span>
        <b>Enhancing the Xcode Simulators.</b> <br />
        Compare designs, show rulers, add a grid, quick actions for recent builds. Create recordings with touches &amp; audio, trim and export them into MP4 or GIF and share them anywhere using drag &amp; drop. Add bezels to screenshots and videos. <a href="https://gumroad.com/a/931293139/ftvbh">Try now</a>
    </span>
</div>

<p>To monitor app performance, we need to gather performance data and export it for analysis. The most straightforward way to achieve this is by using an analytics tool. Let’s begin building our app performance monitoring dashboard.</p>

<div class="language-swift highlighter-rouge"><div class="highlight"><pre class="highlight"><code><span class="kd">protocol</span> <span class="kt">Analytics</span> <span class="p">{</span>
    <span class="kd">func</span> <span class="nf">logEvent</span><span class="p">(</span><span class="n">_</span> <span class="nv">name</span><span class="p">:</span> <span class="kt">String</span><span class="p">,</span> <span class="nv">value</span><span class="p">:</span> <span class="kt">String</span><span class="p">)</span>
    <span class="kd">func</span> <span class="nf">logCrash</span><span class="p">(</span><span class="n">_</span> <span class="nv">crash</span><span class="p">:</span> <span class="kt">MXCrashDiagnostic</span><span class="p">)</span>
<span class="p">}</span>
</code></pre></div></div>

<p>Next, we have to import MetricKit and set up a subscription to receive data.</p>

<div class="language-swift highlighter-rouge"><div class="highlight"><pre class="highlight"><code><span class="kd">final</span> <span class="kd">class</span> <span class="kt">AppDelegate</span><span class="p">:</span> <span class="kt">NSObject</span><span class="p">,</span> <span class="kt">UIApplicationDelegate</span><span class="p">,</span> <span class="kt">MXMetricManagerSubscriber</span> <span class="p">{</span>
    <span class="kd">private</span> <span class="k">var</span> <span class="nv">analytics</span><span class="p">:</span> <span class="kt">Analytics</span><span class="p">?</span>

    <span class="kd">func</span> <span class="nf">applicationDidFinishLaunching</span><span class="p">(</span><span class="n">_</span> <span class="nv">application</span><span class="p">:</span> <span class="kt">UIApplication</span><span class="p">)</span> <span class="p">{</span>
        <span class="kt">MXMetricManager</span><span class="o">.</span><span class="n">shared</span><span class="o">.</span><span class="nf">add</span><span class="p">(</span><span class="k">self</span><span class="p">)</span>
    <span class="p">}</span>

    <span class="kd">nonisolated</span> <span class="kd">func</span> <span class="nf">didReceive</span><span class="p">(</span><span class="n">_</span> <span class="nv">payloads</span><span class="p">:</span> <span class="p">[</span><span class="kt">MXMetricPayload</span><span class="p">])</span> <span class="p">{</span>
        <span class="k">for</span> <span class="n">payload</span> <span class="k">in</span> <span class="n">payloads</span> <span class="p">{</span>
            <span class="k">if</span> <span class="k">let</span> <span class="nv">exitMetrics</span> <span class="o">=</span> <span class="n">payload</span><span class="o">.</span><span class="n">applicationExitMetrics</span><span class="p">?</span><span class="o">.</span><span class="n">backgroundExitData</span> <span class="p">{</span>
                <span class="n">analytics</span><span class="p">?</span><span class="o">.</span><span class="nf">logEvent</span><span class="p">(</span>
                    <span class="s">"performance_abnormal_exit"</span><span class="p">,</span>
                    <span class="nv">value</span><span class="p">:</span> <span class="n">exitMetrics</span><span class="o">.</span><span class="n">cumulativeAbnormalExitCount</span><span class="o">.</span><span class="nf">formatted</span><span class="p">()</span>
                <span class="p">)</span>
                
                <span class="n">analytics</span><span class="p">?</span><span class="o">.</span><span class="nf">logEvent</span><span class="p">(</span>
                    <span class="s">"performance_cpu_exit"</span><span class="p">,</span>
                    <span class="nv">value</span><span class="p">:</span> <span class="n">exitMetrics</span><span class="o">.</span><span class="n">cumulativeCPUResourceLimitExitCount</span><span class="o">.</span><span class="nf">formatted</span><span class="p">()</span>
                <span class="p">)</span>
                    
                <span class="n">analytics</span><span class="p">?</span><span class="o">.</span><span class="nf">logEvent</span><span class="p">(</span>
                    <span class="s">"performance_memory_exit"</span><span class="p">,</span>
                    <span class="nv">value</span><span class="p">:</span> <span class="n">exitMetrics</span><span class="o">.</span><span class="n">cumulativeMemoryPressureExitCount</span><span class="o">.</span><span class="nf">formatted</span><span class="p">()</span>
                <span class="p">)</span>
                
                <span class="n">analytics</span><span class="p">?</span><span class="o">.</span><span class="nf">logEvent</span><span class="p">(</span>
                    <span class="s">"performance_oom_exit"</span><span class="p">,</span>
                    <span class="nv">value</span><span class="p">:</span> <span class="n">exitMetrics</span><span class="o">.</span><span class="n">cumulativeMemoryResourceLimitExitCount</span><span class="o">.</span><span class="nf">formatted</span><span class="p">()</span>
                <span class="p">)</span>
            <span class="p">}</span>
        <span class="p">}</span>
    <span class="p">}</span>

    <span class="kd">nonisolated</span> <span class="kd">func</span> <span class="nf">didReceive</span><span class="p">(</span><span class="n">_</span> <span class="nv">payloads</span><span class="p">:</span> <span class="p">[</span><span class="kt">MXDiagnosticPayload</span><span class="p">])</span> <span class="p">{</span>
        <span class="k">for</span> <span class="n">payload</span> <span class="k">in</span> <span class="n">payloads</span> <span class="p">{</span>
            <span class="k">if</span> <span class="k">let</span> <span class="nv">crashes</span> <span class="o">=</span> <span class="n">payload</span><span class="o">.</span><span class="n">crashDiagnostics</span> <span class="p">{</span>
                <span class="k">for</span> <span class="n">crash</span> <span class="k">in</span> <span class="n">crashes</span> <span class="p">{</span>
                    <span class="n">analytics</span><span class="p">?</span><span class="o">.</span><span class="nf">logCrash</span><span class="p">(</span><span class="n">crash</span><span class="p">)</span>
                <span class="p">}</span>
            <span class="p">}</span>
        <span class="p">}</span>
    <span class="p">}</span>
<span class="p">}</span>
</code></pre></div></div>

<p>As demonstrated in the example above, we utilize the shared instance of the <em>MXMetricManager</em> type to add a subscriber. Our <em>AppDelegate</em> type conforms to the <em>MXMetricManagerSubscriber</em> protocol, which includes two optional functions that enable us to receive metrics and diagnostics.</p>

<p>The <em>MXMetricPayload</em> type contains a collection of properties that extends the <em>MXMetric</em> abstract class. For instance, it includes <em>applicationLaunchMetrics</em> and <em>applicationExitMetrics</em> properties that provide comprehensive details. In our instance, I log a few intriguing background terminations. This knowledge enables me to comprehend the reasons behind the system’s termination of the app.</p>

<p>The <em>MXDiagnosticPayload</em> type contains a collection of properties that extend the abstract <em>MXDiagnostic</em> class. For example, it includes <em>cpuExceptionDiagnostics</em> and <em>crashDiagnostics</em>. We use the <em>logCrash</em> function to extract valuable details and log them.</p>

<p>Both <em>MXMetricPayload</em> and <em>MXDiagnosticPayload</em> offer us JSON and dictionary representations of the properties, enabling us to effortlessly upload this information to our custom-made API endpoint and process it on the backend.</p>

<p>Keep in mind that the <em>MXMetricManager</em> may not always receive payloads. The system can aggregate the data and deliver it on a daily schedule. In rare cases, it may deliver more frequently, but you should not rely on any specific schedule. Both payload types provide the <em>timeStampBegin</em> and <em>timeStampEnd</em> properties, which allow us to determine the range of time covered by each payload.</p>

<p>MetricKit fills a critical gap left by Xcode Organizer by giving us deep, system-level insight into how an app behaves in real-world conditions. By subscribing to <em>MXMetricManager</em> and processing <em>MXMetricPayload</em> and <em>MXDiagnosticPayload</em>, we gain visibility into app launches, terminations, crashes, and resource usage that would otherwise be difficult—or impossible—to fully understand. I hope you enjoyed this one. Feel free to follow me on <a href="https://twitter.com/mecid">Twitter</a> and ask any questions related to this post. Thanks for reading, and see you next week!</p>]]></content><author><name>Majid Jabrayilov</name><email>cmecid@gmail.com</email></author><category term="Meta" /><summary type="html"><![CDATA[Xcode Organizer provides access to essential performance metrics such as crashes, energy impact, hangs, launch time, memory consumption, and app terminations. However, it lacks sufficient information to resolve certain issues, particularly app terminations. To address this, Apple introduced the MetricKit framework, enabling us to collect comprehensive diagnostics and build a detailed performance dashboard.]]></summary><media:thumbnail xmlns:media="http://search.yahoo.com/mrss/" url="https://swiftwithmajid.com/public/instruments.png" /><media:content medium="image" url="https://swiftwithmajid.com/public/instruments.png" xmlns:media="http://search.yahoo.com/mrss/" /></entry><entry><title type="html">Generating images in Swift using Image Playground</title><link href="https://swiftwithmajid.com/2025/11/11/generating-images-in-swift-using-image-playground/" rel="alternate" type="text/html" title="Generating images in Swift using Image Playground" /><published>2025-11-11T00:00:00+00:00</published><updated>2025-11-11T00:00:00+00:00</updated><id>https://swiftwithmajid.com/2025/11/11/generating-images-in-swift-using-image-playground</id><content type="html" xml:base="https://swiftwithmajid.com/2025/11/11/generating-images-in-swift-using-image-playground/"><![CDATA[<p>I’m continuing to work on AI-generated content in my apps, and this time, we’ll focus on image generation. You might be familiar with the Image Playground app on your Apple devices, which also has a Swift API. This week, we’ll explore how to utilize the Image Playground framework to create image content within our apps.</p>

<div class="friends">
    <span>
        <b>Enhancing the Xcode Simulators.</b> <br />
        Compare designs, show rulers, add a grid, quick actions for recent builds. Create recordings with touches &amp; audio, trim and export them into MP4 or GIF and share them anywhere using drag &amp; drop. Add bezels to screenshots and videos. <a href="https://gumroad.com/a/931293139/ftvbh">Try now</a>
    </span>
</div>

<p>Image Playground framework provides us a text-to-image functionality. The core of the framework is the <em>ImageCreator</em> type. Let’s take a look at how we can use it.</p>

<div class="language-swift highlighter-rouge"><div class="highlight"><pre class="highlight"><code><span class="kd">import</span> <span class="kt">ImagePlayground</span>

<span class="kd">public</span> <span class="kd">struct</span> <span class="kt">Eye</span> <span class="p">{</span>
    <span class="kd">public</span> <span class="nf">init</span><span class="p">()</span> <span class="p">{}</span>
    
    <span class="kd">public</span> <span class="kd">func</span> <span class="nf">visualize</span><span class="p">(</span><span class="nv">text</span><span class="p">:</span> <span class="kt">String</span><span class="p">)</span> <span class="k">async</span> <span class="k">throws</span> <span class="o">-&gt;</span> <span class="kt">CGImage</span><span class="p">?</span> <span class="p">{</span>
        <span class="k">let</span> <span class="nv">creator</span> <span class="o">=</span> <span class="k">try</span> <span class="k">await</span> <span class="kt">ImageCreator</span><span class="p">()</span>

        <span class="k">let</span> <span class="nv">images</span> <span class="o">=</span> <span class="n">creator</span><span class="o">.</span><span class="nf">images</span><span class="p">(</span>
            <span class="nv">for</span><span class="p">:</span> <span class="p">[</span><span class="o">.</span><span class="nf">text</span><span class="p">(</span><span class="n">text</span><span class="p">)],</span>
            <span class="nv">style</span><span class="p">:</span> <span class="o">.</span><span class="n">sketch</span><span class="p">,</span>
            <span class="nv">limit</span><span class="p">:</span> <span class="mi">1</span>
        <span class="p">)</span>

        <span class="k">for</span> <span class="k">try</span> <span class="k">await</span> <span class="n">image</span> <span class="k">in</span> <span class="n">images</span> <span class="p">{</span>
            <span class="k">return</span> <span class="n">image</span><span class="o">.</span><span class="n">cgImage</span>
        <span class="p">}</span>

        <span class="k">return</span> <span class="kc">nil</span>
    <span class="p">}</span>
<span class="p">}</span>
</code></pre></div></div>

<p>As you can see in the example above, we create an instance of the <em>ImageCreator</em> type. The initializer may throw an error if the running device doesn’t support image generation.</p>

<p>Next, we create the concepts describing the image we want to generate. Here you can be creative and use a combination of text and source image if needed.</p>

<p>The final step is the call to the <em>images</em> function on an instance of the <em>ImageCreator</em> type. It requires a few parameters: <em>concepts</em>, <em>style</em> and <em>limit</em>.</p>

<p>The <em>ImageCreator</em> type supports a set of styles: <em>animation</em>, <em>illustration</em> and <em>sketch</em>. You can choose the one you need. The <em>limit</em> parameter allows you to limit the number of results, in our example I ask only for a single image. Keep in mind that system allows no more than 4 images.</p>

<p>The <em>images</em> function returns an instance of <em>AsyncSequence</em> which emits the result images one by one as soon as they become ready. That’s why we use here for loop to receive the images.</p>

<p>As I said before, we can mix and match multiple concepts to generate a single image. For example, you can provide a source image and some text.</p>

<div class="language-swift highlighter-rouge"><div class="highlight"><pre class="highlight"><code><span class="kd">public</span> <span class="kd">struct</span> <span class="kt">Eye</span> <span class="p">{</span>
    <span class="kd">public</span> <span class="nf">init</span><span class="p">()</span> <span class="p">{}</span>
    
    <span class="kd">public</span> <span class="kd">func</span> <span class="nf">visualize</span><span class="p">(</span><span class="nv">text</span><span class="p">:</span> <span class="kt">String</span><span class="p">,</span> <span class="nv">image</span><span class="p">:</span> <span class="kt">CGImage</span><span class="p">)</span> <span class="k">async</span> <span class="k">throws</span> <span class="o">-&gt;</span> <span class="kt">CGImage</span><span class="p">?</span> <span class="p">{</span>
        <span class="k">let</span> <span class="nv">creator</span> <span class="o">=</span> <span class="k">try</span> <span class="k">await</span> <span class="kt">ImageCreator</span><span class="p">()</span>

        <span class="k">let</span> <span class="nv">images</span> <span class="o">=</span> <span class="n">creator</span><span class="o">.</span><span class="nf">images</span><span class="p">(</span>
            <span class="nv">for</span><span class="p">:</span> <span class="p">[</span><span class="o">.</span><span class="nf">text</span><span class="p">(</span><span class="n">text</span><span class="p">),</span> <span class="o">.</span><span class="nf">image</span><span class="p">(</span><span class="n">image</span><span class="p">)],</span>
            <span class="nv">style</span><span class="p">:</span> <span class="o">.</span><span class="n">sketch</span><span class="p">,</span>
            <span class="nv">limit</span><span class="p">:</span> <span class="mi">1</span>
        <span class="p">)</span>

        <span class="k">for</span> <span class="k">try</span> <span class="k">await</span> <span class="n">image</span> <span class="k">in</span> <span class="n">images</span> <span class="p">{</span>
            <span class="k">return</span> <span class="n">image</span><span class="o">.</span><span class="n">cgImage</span>
        <span class="p">}</span>

        <span class="k">return</span> <span class="kc">nil</span>
    <span class="p">}</span>
<span class="p">}</span>
</code></pre></div></div>

<p>The <em>ImagePlaygroundConcept</em> type provides us a few static functions allowing us to create a concept. We already use the <em>text</em> and <em>image</em> functions.</p>

<p>There are also <em>drawing</em> and <em>extracted</em> functions. The <em>drawing</em> function allows us to provide an instance of the <em>PKDrawing</em> from the PencilKit framework.</p>

<p>The <em>extracted</em> function becomes useful when you have a huge text like article and you can use it to generate the image for an article.</p>

<p>Not all the styles might be available on your device. That’s why the <em>ImageCreator</em> type provides the static property called <em>availableStyles</em>. It is an array of the supported styles. You should always check if the selected style is available and use only available one.</p>

<div class="language-swift highlighter-rouge"><div class="highlight"><pre class="highlight"><code><span class="kd">public</span> <span class="kd">struct</span> <span class="kt">Eye</span> <span class="p">{</span>
    <span class="kd">public</span> <span class="nf">init</span><span class="p">()</span> <span class="p">{}</span>
    
    <span class="kd">public</span> <span class="kd">func</span> <span class="nf">visualize</span><span class="p">(</span><span class="nv">text</span><span class="p">:</span> <span class="kt">String</span><span class="p">)</span> <span class="k">async</span> <span class="k">throws</span> <span class="o">-&gt;</span> <span class="kt">CGImage</span><span class="p">?</span> <span class="p">{</span>
        <span class="k">let</span> <span class="nv">creator</span> <span class="o">=</span> <span class="k">try</span> <span class="k">await</span> <span class="kt">ImageCreator</span><span class="p">()</span>

        <span class="k">guard</span> <span class="k">let</span> <span class="nv">availableStyle</span> <span class="o">=</span> <span class="n">creator</span><span class="o">.</span><span class="n">availableStyles</span><span class="o">.</span><span class="n">first</span> <span class="k">else</span> <span class="p">{</span>
            <span class="k">return</span> <span class="kc">nil</span>
        <span class="p">}</span>

        <span class="k">let</span> <span class="nv">style</span> <span class="o">=</span> <span class="o">!</span><span class="n">creator</span><span class="o">.</span><span class="n">availableStyles</span><span class="o">.</span><span class="nf">contains</span><span class="p">(</span><span class="o">.</span><span class="n">animation</span><span class="p">)</span> <span class="p">?</span> <span class="nv">availableStyle</span> <span class="p">:</span> <span class="o">.</span><span class="n">animation</span>

        <span class="k">let</span> <span class="nv">images</span> <span class="o">=</span> <span class="n">creator</span><span class="o">.</span><span class="nf">images</span><span class="p">(</span>
            <span class="nv">for</span><span class="p">:</span> <span class="p">[</span><span class="o">.</span><span class="nf">text</span><span class="p">(</span><span class="n">text</span><span class="p">)],</span>
            <span class="nv">style</span><span class="p">:</span> <span class="n">style</span><span class="p">,</span>
            <span class="nv">limit</span><span class="p">:</span> <span class="mi">1</span>
        <span class="p">)</span>

        <span class="k">for</span> <span class="k">try</span> <span class="k">await</span> <span class="n">image</span> <span class="k">in</span> <span class="n">images</span> <span class="p">{</span>
            <span class="k">return</span> <span class="n">image</span><span class="o">.</span><span class="n">cgImage</span>
        <span class="p">}</span>

        <span class="k">return</span> <span class="kc">nil</span>
    <span class="p">}</span>
<span class="p">}</span>
</code></pre></div></div>

<p>The Image Playground framework brings Apple’s generative image capabilities right into Swift, making it surprisingly simple to create visuals from text, drawings, or even existing photos. With just a few lines of code, you can generate styled images and integrate them directly into your app’s experience. I hope you enjoyed this one. Feel free to follow me on <a href="https://twitter.com/mecid">Twitter</a> and ask any questions related to this post. Thanks for reading, and see you next week!</p>]]></content><author><name>Majid Jabrayilov</name><email>cmecid@gmail.com</email></author><category term="Foundation Models" /><summary type="html"><![CDATA[I’m continuing to work on AI-generated content in my apps, and this time, we’ll focus on image generation. You might be familiar with the Image Playground app on your Apple devices, which also has a Swift API. This week, we’ll explore how to utilize the Image Playground framework to create image content within our apps.]]></summary><media:thumbnail xmlns:media="http://search.yahoo.com/mrss/" url="https://swiftwithmajid.com/public/fm.png" /><media:content medium="image" url="https://swiftwithmajid.com/public/fm.png" xmlns:media="http://search.yahoo.com/mrss/" /></entry><entry><title type="html">Introducing Jujutsu VCS. Edit Workflow.</title><link href="https://swiftwithmajid.com/2025/10/22/introducing-jujutsu-vcs-edit-workflow/" rel="alternate" type="text/html" title="Introducing Jujutsu VCS. Edit Workflow." /><published>2025-10-22T00:00:00+00:00</published><updated>2025-10-22T00:00:00+00:00</updated><id>https://swiftwithmajid.com/2025/10/22/introducing-jujutsu-vcs-edit-workflow</id><content type="html" xml:base="https://swiftwithmajid.com/2025/10/22/introducing-jujutsu-vcs-edit-workflow/"><![CDATA[<p>The absence of a staging area and automatic rebases makes our usage of Jujutsu VCS significantly different from what we used to do in Git. There are several popular workflows within the Jujutsu VCS community. This week, I’ll discuss the workflow I use daily, which is called the edit workflow.</p>

<div class="friends">
    <span>
        <b>Enhancing the Xcode Simulators.</b> <br />
        Compare designs, show rulers, add a grid, quick actions for recent builds. Create recordings with touches &amp; audio, trim and export them into MP4 or GIF and share them anywhere using drag &amp; drop. Add bezels to screenshots and videos. <a href="https://gumroad.com/a/931293139/ftvbh">Try now</a>
    </span>
</div>

<p>When you begin using Jujutsu VCS, the first thing you’ll notice is the absence of a staging area. Instead, it captures snapshots of your code every time you run the jj command in the terminal. This approach significantly differs from our workflows in Git.</p>

<blockquote>
  <p>To learn more about the basics of the Jujutsu VCS, take a look at my <a href="/2025/10/15/introducing-jujutsu-vcs/">“Introducing Jujutsu VCS”</a> post.</p>
</blockquote>

<p>Constant snapshots and automatic rebases played a significant role in the development of the edit workflow. I’ve been utilizing this workflow since the first day and can’t express my gratitude enough. Here’s how we do it.</p>

<p>Assume that you are working on a feature requiring new model type, some sort of state storage and the view part that manipulates models via storage. We plan the work and split it into a few changes. So, we create empty changes.</p>

<blockquote>
  <p>jj new -m “introducing user model”</p>
</blockquote>

<blockquote>
  <p>jj new -m “introducing user storage”</p>
</blockquote>

<blockquote>
  <p>jj new -m “introducing user master and details views”</p>
</blockquote>

<p><img src="/public/jj3.png" alt="jj-log" /></p>

<p>Now we have three empty changes in the jj log. Let’s start populating them with the code. Let’s switch to the first change using the <strong>edit</strong> command.</p>

<blockquote>
  <p>jj edit rysqysmx</p>
</blockquote>

<p>We can use the <em>edit</em> command to switch to any mutable change in the log. As you can see, we define the change using the short identifier indicated in the log. Now, we can express our user model. As soon as we finished our work on the user model we can move to the next part of the task and create user storage.</p>

<blockquote>
  <p>jj next —edit</p>
</blockquote>

<p>We employ the <strong>next</strong> command with the <em>edit</em> argument to navigate to the subsequent change in the tree. While we can still utilize the <em>edit</em> command with the specific identifier, I find the <em>next</em> command more convenient in this workflow. Whenever you move to the next change, jj executes rebase, and you’re working in the fresh state, encompassing all previous changes.</p>

<p>Assume, you forgot an entity while planing your changes and now you need to squeeze in a change. No worries, you can use the <strong>new</strong> command with particular positioning in the tree of changes.</p>

<blockquote>
  <p>jj new -A r -m “introducing user endpoint”</p>
</blockquote>

<p>As you can see, we use the <em>new</em> command with <strong>-A</strong> argument allowing us to create a change after a particular change. We can also use <strong>-B</strong> to create before a change. And don’t worry about the state of your changes, jj automatically makes rebases and you are always in a fresh state.</p>

<p>The final piece of this workflow is the <strong>absorb</strong> command. Imagine that you almost finished the work on your feature then requirements changes and a new property on the user model appeared. This addition requires modifications in almost every change you have been working recently.</p>

<p>Instead of switching between changes using the <em>edit</em> command, we can create a new change.</p>

<blockquote>
  <p>jj new -m “Adding a new property to the user model to display in the user view”</p>
</blockquote>

<p>You add a new property to the user model, tune the user master and details view to render it. It would be much better to have these changes in previous changes. Fortunately, there is the <em>absorb</em> command.</p>

<blockquote>
  <p>jj absorb</p>
</blockquote>

<p>You can use the <em>absorb</em> command on the recent change to find the best place for that change between the mutable changes in your history. It automatically moves a property addition part of the change to the user model changes where you created that model, and user view modifications to the changes where you created those views.</p>

<p>The <em>absorb</em> command uses blame to find the best place, but it can keep some modifications in the recent change if it can find a good place for them. So, it works in a very safe manner.</p>

<p>Once you get used to automatic rebases and the ability to reshuffle or absorb changes effortlessly, going back to Git’s manual staging and rebasing feels unnecessarily rigid. The edit workflow isn’t just a new habit; it’s a mindset shift — from managing commits to shaping history as you go. I hope you enjoyed this one. Feel free to follow me on <a href="https://twitter.com/mecid">Twitter</a> and ask any questions related to this post. Thanks for reading, and see you next week!</p>]]></content><author><name>Majid Jabrayilov</name><email>cmecid@gmail.com</email></author><category term="Meta" /><summary type="html"><![CDATA[The absence of a staging area and automatic rebases makes our usage of Jujutsu VCS significantly different from what we used to do in Git. There are several popular workflows within the Jujutsu VCS community. This week, I’ll discuss the workflow I use daily, which is called the edit workflow.]]></summary><media:thumbnail xmlns:media="http://search.yahoo.com/mrss/" url="https://swiftwithmajid.com/public/jj.png" /><media:content medium="image" url="https://swiftwithmajid.com/public/jj.png" xmlns:media="http://search.yahoo.com/mrss/" /></entry><entry><title type="html">Introducing Jujutsu VCS</title><link href="https://swiftwithmajid.com/2025/10/15/introducing-jujutsu-vcs/" rel="alternate" type="text/html" title="Introducing Jujutsu VCS" /><published>2025-10-15T00:00:00+00:00</published><updated>2025-10-15T00:00:00+00:00</updated><id>https://swiftwithmajid.com/2025/10/15/introducing-jujutsu-vcs</id><content type="html" xml:base="https://swiftwithmajid.com/2025/10/15/introducing-jujutsu-vcs/"><![CDATA[<p>I’ve been using Jujutsu VCS for a few months now, and it’s completely changed how I work with version control. No — it’s not a martial art — it’s a modern, Git-compatible version control system that blends the reliability of Git with a much more fluid and intuitive workflow.</p>

<div class="friends">
    <span>
        <b>Enhancing the Xcode Simulators.</b> <br />
        Compare designs, show rulers, add a grid, quick actions for recent builds. Create recordings with touches &amp; audio, trim and export them into MP4 or GIF and share them anywhere using drag &amp; drop. Add bezels to screenshots and videos. <a href="https://gumroad.com/a/931293139/ftvbh">Try now</a>
    </span>
</div>

<p>First and foremost, Jujutsu VCS is Git‑compatible. You can use it with any Git repository, and nobody on your team will notice a difference — even if they continue using Git.</p>

<p>For the rest of the article, I’ll refer to Jujutsu VCS as JJ. To install JJ, follow these <a href="https://jj-vcs.github.io/jj/latest/install-and-setup/">instructions</a>. To start working with JJ, clone a Git repository or initialize an empty one using the following terminal commands:</p>

<blockquote>
  <p>jj git clone repo_url</p>
</blockquote>

<p>or</p>

<blockquote>
  <p>jj git init</p>
</blockquote>

<p>Let’s talk about how JJ differs from Git. In JJ, you work with changes instead of commits, and those changes remain mutable until you push them to a remote. That means you can freely move between changes and edit them.</p>

<blockquote>
  <p>jj new</p>
</blockquote>

<p>Instead of committing your code after the fact, you create an empty change before you start writing. There’s no staging area — JJ automatically tracks everything you modify. A change contains a series of snapshots of your code. Every time you run a JJ command in the terminal, it makes a snapshot and appends it to the most recent change.</p>

<p>When you finish work on the current change and want to start another, use:</p>

<blockquote>
  <p>jj desc -m “describe the work you have done”</p>
</blockquote>

<blockquote>
  <p>jj new</p>
</blockquote>

<p>Changes make history manipulation simple. Rebase, squash, and split are everyday operations. Here’s the log of my repo. Suppose I want to insert a change between the last two changes — nothing could be easier.</p>

<p><img src="/public/jj1.png" alt="jj-terminal" /></p>

<p>To insert a change after a specific one:</p>

<blockquote>
  <p>jj new -A px</p>
</blockquote>

<p>The -A argument means “after”; it creates an empty change after the change with ID <code class="language-plaintext highlighter-rouge">px</code>. You can also use -B to create an empty change “before” <code class="language-plaintext highlighter-rouge">px</code>. The great thing about inserting changes is that JJ automatically rebases subsequent changes. That’s my favorite thing about JJ: when you change history, it automatically rebases, and it rarely results in conflicts.</p>

<p><img src="/public/jj2.png" alt="jj-terminal" /></p>

<blockquote>
  <p>jj squash</p>
</blockquote>

<p>The squash command is another simple, powerful tool: it appends the most recent change to the previous one.</p>

<blockquote>
  <p>jj squash –into px</p>
</blockquote>

<p>Use the into argument to specify which change to squash into, and JJ will automatically rebase subsequent changes as needed.</p>

<blockquote>
  <p>jj undo</p>
</blockquote>

<p>Another great utility is undo. You can always call it to revert the most recent operation — snapshot, rebase, squash, merge, and so on.</p>

<blockquote>
  <p>jj new master</p>
</blockquote>

<blockquote>
  <p>jj new master</p>
</blockquote>

<p>Creating more than one change with the same parent is enough to start branching in JJ. Branches are anonymous — they don’t have names. That might seem odd at first, but it works really well. If you need a Git‑compatible branch, set a bookmark on a change.</p>

<blockquote>
  <p>jj bookmark set new-feature</p>
</blockquote>

<blockquote>
  <p>jj git push -b new-feature</p>
</blockquote>

<p>Finally, to delete a change, run:</p>

<blockquote>
  <p>jj abandon px</p>
</blockquote>

<p>This removes the change and its code, then rebases subsequent changes.</p>

<p>JJ reimagines version control, making history manipulation effortless. It’s fully compatible with Git but offers a more flexible, fluid workflow. I’ll share more advanced techniques — such as rebasing across branches — in future posts. I hope you enjoyed this one. Feel free to follow me on <a href="https://twitter.com/mecid">Twitter</a> and ask any questions related to this post. Thanks for reading, and see you next week!</p>]]></content><author><name>Majid Jabrayilov</name><email>cmecid@gmail.com</email></author><category term="Meta" /><summary type="html"><![CDATA[I’ve been using Jujutsu VCS for a few months now, and it’s completely changed how I work with version control. No — it’s not a martial art — it’s a modern, Git-compatible version control system that blends the reliability of Git with a much more fluid and intuitive workflow.]]></summary><media:thumbnail xmlns:media="http://search.yahoo.com/mrss/" url="https://swiftwithmajid.com/public/jj.png" /><media:content medium="image" url="https://swiftwithmajid.com/public/jj.png" xmlns:media="http://search.yahoo.com/mrss/" /></entry><entry><title type="html">Building AI features using Foundation Models. Streaming.</title><link href="https://swiftwithmajid.com/2025/10/08/building-ai-features-using-foundation-models-streaming/" rel="alternate" type="text/html" title="Building AI features using Foundation Models. Streaming." /><published>2025-10-08T00:00:00+00:00</published><updated>2025-10-08T00:00:00+00:00</updated><id>https://swiftwithmajid.com/2025/10/08/building-ai-features-using-foundation-models-streaming</id><content type="html" xml:base="https://swiftwithmajid.com/2025/10/08/building-ai-features-using-foundation-models-streaming/"><![CDATA[<p>We’ve already discussed the fundamental concepts of Foundation Models and their structured outputs. This week, we’ll delve into the process of streaming the partial results generated by the model.</p>

<div class="friends">
    <span>
        <b>Enhancing the Xcode Simulators.</b> <br />
        Compare designs, show rulers, add a grid, quick actions for recent builds. Create recordings with touches &amp; audio, trim and export them into MP4 or GIF and share them anywhere using drag &amp; drop. Add bezels to screenshots and videos. <a href="https://gumroad.com/a/931293139/ftvbh">Try now</a>
    </span>
</div>

<p>We are already familiar with requesting and waiting for the results from Foundation Models. However, there are examples where we require real-time experience, where the intermediate output is displayed while the model is processing.</p>

<div class="language-swift highlighter-rouge"><div class="highlight"><pre class="highlight"><code><span class="kd">import</span> <span class="kt">FoundationModels</span>

<span class="kd">@Generable</span> <span class="kd">struct</span> <span class="kt">Article</span> <span class="p">{</span>
    <span class="kd">@Guide</span><span class="p">(</span><span class="nv">description</span><span class="p">:</span> <span class="s">"The title of the article"</span><span class="p">)</span>
    <span class="k">let</span> <span class="nv">title</span><span class="p">:</span> <span class="kt">String</span>

    <span class="kd">@Guide</span><span class="p">(</span><span class="nv">description</span><span class="p">:</span> <span class="s">"The content of the article"</span><span class="p">)</span>
    <span class="k">let</span> <span class="nv">body</span><span class="p">:</span> <span class="kt">String</span>

    <span class="kd">@Guide</span><span class="p">(</span><span class="nv">description</span><span class="p">:</span> <span class="s">"Useful tips related to the article"</span><span class="p">)</span>
    <span class="k">let</span> <span class="nv">tips</span><span class="p">:</span> <span class="p">[</span><span class="kt">String</span><span class="p">]</span>
<span class="p">}</span>

<span class="kd">import</span> <span class="kt">Playgrounds</span>

<span class="cp">#Playground {</span>
    <span class="k">let</span> <span class="nv">articleGenerationInstructions</span> <span class="o">=</span> <span class="s">"Write a health related article."</span>
    <span class="k">let</span> <span class="nv">session</span> <span class="o">=</span> <span class="kt">LanguageModelSession</span><span class="p">(</span><span class="nv">instructions</span><span class="p">:</span> <span class="n">articleGenerationInstructions</span><span class="p">)</span>
    <span class="k">let</span> <span class="nv">response</span> <span class="o">=</span> <span class="n">session</span><span class="o">.</span><span class="nf">respond</span><span class="p">(</span><span class="nv">to</span><span class="p">:</span> <span class="s">"Heart Rate"</span><span class="p">,</span> <span class="nv">generating</span><span class="p">:</span> <span class="kt">Article</span><span class="o">.</span><span class="k">self</span><span class="p">)</span>

    <span class="nf">print</span><span class="p">(</span><span class="n">response</span><span class="o">.</span><span class="n">content</span><span class="p">)</span>
<span class="p">}</span>
</code></pre></div></div>

<p>As demonstrated in the example above, we define the <em>Article</em> type, which is annotated with the <em>Generable</em> macro. This macro enables us to receive the response from the Foundation Model in a specific format defined by the type. So, the Foundation Model generates an instance of the <em>Article</em> type and populates its properties with the guided content.</p>

<p>Here, we utilize the <strong>await</strong> keyword to wait for the final output. However, what if we desire to display the partial results and append additional content as soon as the Foundation Model generates it? For this specific scenario, Apple introduced the Streaming API for Foundation Models.</p>

<div class="language-swift highlighter-rouge"><div class="highlight"><pre class="highlight"><code><span class="kd">import</span> <span class="kt">Playgrounds</span>

<span class="cp">#Playground {</span>
    <span class="k">let</span> <span class="nv">articleGenerationInstructions</span> <span class="o">=</span> <span class="s">"Write a health related article."</span>
    <span class="k">let</span> <span class="nv">session</span> <span class="o">=</span> <span class="kt">LanguageModelSession</span><span class="p">(</span><span class="nv">instructions</span><span class="p">:</span> <span class="n">articleGenerationInstructions</span><span class="p">)</span>
    <span class="k">let</span> <span class="nv">stream</span> <span class="o">=</span> <span class="n">session</span><span class="o">.</span><span class="nf">streamResponse</span><span class="p">(</span><span class="nv">to</span><span class="p">:</span> <span class="s">"heart rate"</span><span class="p">,</span> <span class="nv">generating</span><span class="p">:</span> <span class="kt">Article</span><span class="o">.</span><span class="k">self</span><span class="p">)</span>

    <span class="k">for</span> <span class="k">try</span> <span class="k">await</span> <span class="n">article</span> <span class="k">in</span> <span class="n">stream</span> <span class="p">{</span>
        <span class="nf">print</span><span class="p">(</span><span class="n">article</span><span class="p">)</span>
    <span class="p">}</span>
<span class="p">}</span>
</code></pre></div></div>

<p>As you can see, all we need to do is use the <em>streamResponse</em> function instead of the <em>respond</em> function. The <em>streamResponse</em> function returns us an instance of the <em>ResponseStream</em> conforming to the <em>AsyncSequence</em> protocol and emitting the partial results of the <em>Article</em> type.</p>

<p>We define the <em>Article</em> type as a plain structure with properties using the <strong>let</strong> constant. All the magic here is hidden behind the <em>Generable</em> annotation. It automatically defines the <em>PartiallyGenerated</em> type inside the <em>Article</em> type, which defines the same properties, making them optional.</p>

<p>The order you define properties in the <em>Article</em> type plays a huge role. The Foundation Model respects the order you define properties and generates the title first, then the body and tips at the end. So, you should display them in the order you define them to make the user experience nice and appealing.</p>

<div class="language-swift highlighter-rouge"><div class="highlight"><pre class="highlight"><code><span class="kd">import</span> <span class="kt">Playgrounds</span>

<span class="cp">#Playground {</span>
    <span class="k">let</span> <span class="nv">articleGenerationInstructions</span> <span class="o">=</span> <span class="s">"Write a health related article."</span>
    <span class="k">let</span> <span class="nv">session</span> <span class="o">=</span> <span class="kt">LanguageModelSession</span><span class="p">(</span><span class="nv">instructions</span><span class="p">:</span> <span class="n">articleGenerationInstructions</span><span class="p">)</span>
    <span class="k">let</span> <span class="nv">stream</span> <span class="o">=</span> <span class="n">session</span><span class="o">.</span><span class="nf">streamResponse</span><span class="p">(</span><span class="nv">to</span><span class="p">:</span> <span class="s">"heart rate"</span><span class="p">,</span> <span class="nv">generating</span><span class="p">:</span> <span class="kt">Article</span><span class="o">.</span><span class="k">self</span><span class="p">)</span>

    <span class="k">for</span> <span class="k">try</span> <span class="k">await</span> <span class="n">article</span> <span class="k">in</span> <span class="n">stream</span> <span class="p">{</span>
        <span class="nf">print</span><span class="p">(</span><span class="n">article</span><span class="o">.</span><span class="n">content</span><span class="p">)</span>
    <span class="p">}</span>

    <span class="k">let</span> <span class="nv">article</span> <span class="o">=</span> <span class="k">try</span> <span class="k">await</span> <span class="n">stream</span><span class="o">.</span><span class="nf">collect</span><span class="p">()</span>
    <span class="nf">print</span><span class="p">(</span><span class="n">article</span><span class="o">.</span><span class="n">content</span><span class="p">)</span>
<span class="p">}</span>
</code></pre></div></div>

<p>You can always await the final result using the <em>collect</em> function on the <em>ResponseStream</em> type. It might be useful to collect the final results after iterating through the async sequence.</p>

<p>Streaming transforms how we interact with Foundation Models, shifting from static responses to dynamic, real-time experiences. By leveraging the streamResponse API, we can progressively display model output as it’s generated — enhancing responsiveness and user engagement. I hope you enjoy the post. Feel free to follow me on <a href="https://twitter.com/mecid">Twitter</a> and ask your questions related to this post. Thanks for reading, and see you next week!</p>]]></content><author><name>Majid Jabrayilov</name><email>cmecid@gmail.com</email></author><category term="Foundation Models" /><summary type="html"><![CDATA[We’ve already discussed the fundamental concepts of Foundation Models and their structured outputs. This week, we’ll delve into the process of streaming the partial results generated by the model.]]></summary><media:thumbnail xmlns:media="http://search.yahoo.com/mrss/" url="https://swiftwithmajid.com/public/fm.png" /><media:content medium="image" url="https://swiftwithmajid.com/public/fm.png" xmlns:media="http://search.yahoo.com/mrss/" /></entry><entry><title type="html">Feature flags in Swift</title><link href="https://swiftwithmajid.com/2025/09/16/feature-flags-in-swift/" rel="alternate" type="text/html" title="Feature flags in Swift" /><published>2025-09-16T00:00:00+00:00</published><updated>2025-09-16T00:00:00+00:00</updated><id>https://swiftwithmajid.com/2025/09/16/feature-flags-in-swift</id><content type="html" xml:base="https://swiftwithmajid.com/2025/09/16/feature-flags-in-swift/"><![CDATA[<p>Almost every project I work on has at least three build configurations: Debug, TestFlight, and App Store. These configurations differ not only in build settings but also in functionality. This week, we’ll learn how to implement feature flags in Swift, which allow us to toggle on and off specific functionalities under certain conditions.</p>

<div class="friends">
    <span>
        <b>Enhancing the Xcode Simulators.</b> <br />
        Compare designs, show rulers, add a grid, quick actions for recent builds. Create recordings with touches &amp; audio, trim and export them into MP4 or GIF and share them anywhere using drag &amp; drop. Add bezels to screenshots and videos. <a href="https://gumroad.com/a/931293139/ftvbh">Try now</a>
    </span>
</div>

<p>As a big fan of trunk-based development, feature flags play a crucial role in my development approach. Almost every feature I’m working on recently has a feature flag enabling it in debug and TestFlight builds. While applying the trunk-based approach, I merge my branches even when the feature is not fully implemented, that’s why I use feature flags to temporarily disable them.</p>

<p>By default, any Xcode project has two configurations: Debug and Release. You can create as many as you need of them, and I always make duplicates for Release configuration named AppStore and TestFlight. This allows you to create custom Xcode schemes running one of the available configurations. Then we can use compilation conditions in code to understand which scheme is active now.</p>

<p>Let’s start first by creating the <em>Distribution</em> enum defining our Xcode schemes.</p>

<div class="language-swift highlighter-rouge"><div class="highlight"><pre class="highlight"><code><span class="kd">public</span> <span class="kd">enum</span> <span class="kt">Distribution</span><span class="p">:</span> <span class="kt">Sendable</span> <span class="p">{</span>
    <span class="k">case</span> <span class="n">debug</span>
    <span class="k">case</span> <span class="n">appstore</span>
    <span class="k">case</span> <span class="n">testflight</span>
<span class="p">}</span>

<span class="kd">extension</span> <span class="kt">Distribution</span> <span class="p">{</span>
    <span class="kd">static</span> <span class="k">var</span> <span class="nv">current</span><span class="p">:</span> <span class="k">Self</span> <span class="p">{</span>
        <span class="cp">#if APPSTORE</span>
        <span class="k">return</span> <span class="o">.</span><span class="n">appstore</span>
        <span class="cp">#elseif TESTFLIGHT</span>
        <span class="k">return</span> <span class="o">.</span><span class="n">testflight</span>
        <span class="cp">#else</span>
        <span class="k">return</span> <span class="o">.</span><span class="n">debug</span>
        <span class="cp">#endif</span>
    <span class="p">}</span>
<span class="p">}</span>
</code></pre></div></div>

<p>As you can see in the example above, the <em>Distribution</em> type is pretty simple. We define the static <em>current</em> property that switches over compilation conditions to find the active one. Now, we can move on to the <em>FeatureFlags</em> type that should define features I’m working on at the moment or some configuration flags.</p>

<div class="language-swift highlighter-rouge"><div class="highlight"><pre class="highlight"><code><span class="kd">public</span> <span class="kd">struct</span> <span class="kt">FeatureFlags</span><span class="p">:</span> <span class="kt">Sendable</span><span class="p">,</span> <span class="kt">Decodable</span> <span class="p">{</span>
    <span class="kd">public</span> <span class="k">let</span> <span class="nv">requirePaywall</span><span class="p">:</span> <span class="kt">Bool</span>
    <span class="kd">public</span> <span class="k">let</span> <span class="nv">requireOnboarding</span><span class="p">:</span> <span class="kt">Bool</span>
    <span class="kd">public</span> <span class="k">let</span> <span class="nv">featureX</span><span class="p">:</span> <span class="kt">Bool</span>

    <span class="kd">public</span> <span class="nf">init</span><span class="p">(</span><span class="nv">distribution</span><span class="p">:</span> <span class="kt">Distribution</span><span class="p">)</span> <span class="p">{</span>
        <span class="k">switch</span> <span class="n">distribution</span> <span class="p">{</span>
        <span class="k">case</span> <span class="o">.</span><span class="nv">debug</span><span class="p">:</span>
            <span class="k">self</span><span class="o">.</span><span class="n">requirePaywall</span> <span class="o">=</span> <span class="kc">true</span>
            <span class="k">self</span><span class="o">.</span><span class="n">requireOnboarding</span> <span class="o">=</span> <span class="kc">true</span>
            <span class="k">self</span><span class="o">.</span><span class="n">featureX</span> <span class="o">=</span> <span class="kc">true</span>
        <span class="k">case</span> <span class="o">.</span><span class="nv">appstore</span><span class="p">:</span>
            <span class="k">self</span><span class="o">.</span><span class="n">requirePaywall</span> <span class="o">=</span> <span class="kc">true</span>
            <span class="k">self</span><span class="o">.</span><span class="n">requireOnboarding</span> <span class="o">=</span> <span class="kc">true</span>
            <span class="k">self</span><span class="o">.</span><span class="n">featureX</span> <span class="o">=</span> <span class="kc">false</span>
        <span class="k">case</span> <span class="o">.</span><span class="nv">testflight</span><span class="p">:</span>
            <span class="k">self</span><span class="o">.</span><span class="n">requirePaywall</span> <span class="o">=</span> <span class="kc">false</span>
            <span class="k">self</span><span class="o">.</span><span class="n">requireOnboarding</span> <span class="o">=</span> <span class="kc">true</span>
            <span class="k">self</span><span class="o">.</span><span class="n">featureX</span> <span class="o">=</span> <span class="kc">true</span>
        <span class="p">}</span>
    <span class="p">}</span>
<span class="p">}</span>
</code></pre></div></div>

<p>The <em>FeatureFlags</em> type defines a bunch of properties that I switch on and off for different build types. As you can see, the <em>init</em> function takes an instance of the <em>Distribution</em> type, allowing me to pass the active distribution.</p>

<p>While working in Xcode, I choose the debug configuration because it doesn’t contain too many compiler optimizations, builds fast and allows me to see what I’m working on. That’s why I turn on all the flags for debug condition.</p>

<p>I would like to give access to all features, even paid features to my TestFlight users, so I can be sure that everything working well. That’s why I disable paywall for TestFlight users.</p>

<div class="language-swift highlighter-rouge"><div class="highlight"><pre class="highlight"><code><span class="kd">extension</span> <span class="kt">EnvironmentValues</span> <span class="p">{</span>
    <span class="kd">@Entry</span> <span class="kd">public</span> <span class="k">var</span> <span class="nv">featureFlags</span> <span class="o">=</span> <span class="kt">FeatureFlags</span><span class="p">(</span><span class="nv">distribution</span><span class="p">:</span> <span class="o">.</span><span class="n">debug</span><span class="p">)</span>
<span class="p">}</span>
</code></pre></div></div>

<p>The final step is to put an instance of the <em>FeatureFlags</em> type into the SwiftUI environment to share it in the view hierarchy so my views can disable or enable particular functionality.</p>

<div class="language-swift highlighter-rouge"><div class="highlight"><pre class="highlight"><code><span class="kd">@main</span>
<span class="kd">struct</span> <span class="kt">CardioBotApp</span><span class="p">:</span> <span class="kt">App</span> <span class="p">{</span>
    <span class="k">var</span> <span class="nv">body</span><span class="p">:</span> <span class="kd">some</span> <span class="kt">Scene</span> <span class="p">{</span>
        <span class="kt">WindowGroup</span> <span class="p">{</span>
            <span class="kt">RootView</span><span class="p">()</span>
                <span class="o">.</span><span class="nf">environment</span><span class="p">(\</span><span class="o">.</span><span class="n">featureFlags</span><span class="p">,</span> <span class="kt">FeatureFlags</span><span class="p">(</span><span class="nv">distribution</span><span class="p">:</span> <span class="o">.</span><span class="n">current</span><span class="p">))</span>
        <span class="p">}</span>
    <span class="p">}</span>
<span class="p">}</span>
</code></pre></div></div>

<p>Feature flags aren’t permanent. Treat them as temporary helpers - remove them when the feature is ready and proven. And if your project grows, consider making them remotely configurable to roll out or roll back features instantly. With this approach, you’ll keep your development process fast, safe, and ready for continuous delivery.</p>

<p>When paired with trunk-based development, they let you merge work early and often without worrying about breaking production. You can hide incomplete features behind flags, test them safely in Debug and TestFlight builds, and enable them only when you’re confident they’re ready. I hope you enjoy the post. Feel free to follow me on <a href="https://twitter.com/mecid">Twitter</a> and ask your questions related to this post. Thanks for reading, and see you next week!</p>]]></content><author><name>Majid Jabrayilov</name><email>cmecid@gmail.com</email></author><category term="Architecture" /><summary type="html"><![CDATA[Almost every project I work on has at least three build configurations: Debug, TestFlight, and App Store. These configurations differ not only in build settings but also in functionality. This week, we’ll learn how to implement feature flags in Swift, which allow us to toggle on and off specific functionalities under certain conditions.]]></summary><media:thumbnail xmlns:media="http://search.yahoo.com/mrss/" url="https://swiftwithmajid.com/public/xcode-cloud.png" /><media:content medium="image" url="https://swiftwithmajid.com/public/xcode-cloud.png" xmlns:media="http://search.yahoo.com/mrss/" /></entry><entry><title type="html">Building AI features using Foundation Models. Structured Content.</title><link href="https://swiftwithmajid.com/2025/08/26/building-ai-features-using-foundation-models-structured-content/" rel="alternate" type="text/html" title="Building AI features using Foundation Models. Structured Content." /><published>2025-08-26T00:00:00+00:00</published><updated>2025-08-26T00:00:00+00:00</updated><id>https://swiftwithmajid.com/2025/08/26/building-ai-features-using-foundation-models-structured-content</id><content type="html" xml:base="https://swiftwithmajid.com/2025/08/26/building-ai-features-using-foundation-models-structured-content/"><![CDATA[<p>Last week, we talked about the basics of Foundation Models, how to generate text content, and how to tune and control the output. This week, we will talk about simple and yet powerful structured content generation.</p>

<div class="friends">
    <span>
        <b>Enhancing the Xcode Simulators.</b> <br />
        Compare designs, show rulers, add a grid, quick actions for recent builds. Create recordings with touches &amp; audio, trim and export them into MP4 or GIF and share them anywhere using drag &amp; drop. Add bezels to screenshots and videos. <a href="https://gumroad.com/a/931293139/ftvbh">Try now</a>
    </span>
</div>

<p>Generating text content using Foundation Models is easy-peasy. You can use it for many things like coaching, smart assistants, chats, etc.</p>

<div class="language-swift highlighter-rouge"><div class="highlight"><pre class="highlight"><code><span class="kd">import</span> <span class="kt">FoundationModels</span>

<span class="kd">struct</span> <span class="kt">Intelligence</span> <span class="p">{</span>
    <span class="kd">public</span> <span class="kd">func</span> <span class="nf">generate</span><span class="p">(</span><span class="n">_</span> <span class="nv">input</span><span class="p">:</span> <span class="kt">String</span><span class="p">)</span> <span class="k">async</span> <span class="k">throws</span> <span class="o">-&gt;</span> <span class="kt">String</span> <span class="p">{</span>
        <span class="k">guard</span> <span class="kt">SystemLanguageModel</span><span class="o">.</span><span class="k">default</span><span class="o">.</span><span class="n">isAvailable</span> <span class="k">else</span> <span class="p">{</span>
            <span class="k">return</span> <span class="n">input</span>
        <span class="p">}</span>
        
        <span class="k">let</span> <span class="nv">session</span> <span class="o">=</span> <span class="kt">LanguageModelSession</span><span class="p">()</span>
        
        <span class="k">let</span> <span class="nv">response</span> <span class="o">=</span> <span class="k">try</span> <span class="k">await</span> <span class="n">session</span><span class="o">.</span><span class="nf">respond</span><span class="p">(</span><span class="nv">to</span><span class="p">:</span> <span class="n">input</span><span class="p">)</span>
        <span class="k">return</span> <span class="n">response</span><span class="o">.</span><span class="n">content</span>
    <span class="p">}</span>
<span class="p">}</span>
</code></pre></div></div>

<p>Structured content generation works pretty much the same way; the only addition is the structure you provide that the Foundation Model should infer and return the result in the very same structure.</p>

<div class="language-swift highlighter-rouge"><div class="highlight"><pre class="highlight"><code><span class="kd">struct</span> <span class="kt">Intelligence</span> <span class="p">{</span>
    <span class="kd">private</span> <span class="k">var</span> <span class="nv">recipeInstructions</span><span class="p">:</span> <span class="kt">String</span> <span class="p">{</span>
    <span class="s">"""
    You are a professional nutritionist and chef specializing in healthy meal planning. Generate a recipe using provided ingredients.
    """</span>
    
    <span class="kd">func</span> <span class="nf">generateRecipe</span><span class="p">(</span><span class="n">with</span> <span class="nv">ingredients</span><span class="p">:</span> <span class="kt">String</span><span class="p">)</span> <span class="k">async</span> <span class="k">throws</span> <span class="o">-&gt;</span> <span class="kt">Recipe</span> <span class="p">{</span>
        <span class="k">let</span> <span class="nv">session</span> <span class="o">=</span> <span class="kt">LanguageModelSession</span><span class="p">(</span><span class="nv">instructions</span><span class="p">:</span> <span class="n">recipeInstructions</span><span class="p">)</span>
        <span class="k">let</span> <span class="nv">recipe</span> <span class="o">=</span> <span class="k">try</span> <span class="k">await</span> <span class="n">session</span><span class="o">.</span><span class="nf">respond</span><span class="p">(</span><span class="nv">to</span><span class="p">:</span> <span class="n">prompt</span><span class="p">,</span> <span class="nv">generating</span><span class="p">:</span> <span class="kt">Recipe</span><span class="o">.</span><span class="k">self</span><span class="p">)</span>
        <span class="k">return</span> <span class="n">recipe</span><span class="o">.</span><span class="n">content</span>
    <span class="p">}</span>
<span class="p">}</span>
</code></pre></div></div>

<p>As you can see in the example above, we use the <em>respond</em> function with the <em>prompt</em> and an additional parameter called <em>generating</em>. The <em>generating</em> parameter receives the type that Foundation Model should infer and return the instance. Now, let’s take a look at the <em>Recipe</em> type.</p>

<div class="language-swift highlighter-rouge"><div class="highlight"><pre class="highlight"><code><span class="kd">@Generable</span>
<span class="kd">struct</span> <span class="kt">Recipe</span> <span class="p">{</span>
    <span class="kd">@Guide</span><span class="p">(</span><span class="nv">description</span><span class="p">:</span> <span class="s">"Shortened title for items, without numbers."</span><span class="p">)</span>
    <span class="k">let</span> <span class="nv">title</span><span class="p">:</span> <span class="kt">String</span>

    <span class="kd">@Guide</span><span class="p">(</span><span class="nv">description</span><span class="p">:</span> <span class="s">"Total energy in kilocalories."</span><span class="p">)</span>
    <span class="k">let</span> <span class="nv">energy</span><span class="p">:</span> <span class="kt">Double</span>

    <span class="kd">@Guide</span><span class="p">(</span><span class="nv">description</span><span class="p">:</span> <span class="s">"Total amount of protein in grams."</span><span class="p">)</span>
    <span class="k">let</span> <span class="nv">protein</span><span class="p">:</span> <span class="kt">Double</span>

    <span class="kd">@Guide</span><span class="p">(</span><span class="nv">description</span><span class="p">:</span> <span class="s">"Total amount of carbohydrates in grams."</span><span class="p">)</span>
    <span class="k">let</span> <span class="nv">carbs</span><span class="p">:</span> <span class="kt">Double</span>

    <span class="kd">@Guide</span><span class="p">(</span><span class="nv">description</span><span class="p">:</span> <span class="s">"Total amount of fiber in grams."</span><span class="p">)</span>
    <span class="k">let</span> <span class="nv">fiber</span><span class="p">:</span> <span class="kt">Double</span>

    <span class="kd">@Guide</span><span class="p">(</span><span class="nv">description</span><span class="p">:</span> <span class="s">"Total amount of sugar in grams."</span><span class="p">)</span>
    <span class="k">let</span> <span class="nv">sugar</span><span class="p">:</span> <span class="kt">Double</span>

    <span class="kd">@Guide</span><span class="p">(</span><span class="nv">description</span><span class="p">:</span> <span class="s">"Total amount of fat in grams."</span><span class="p">)</span>
    <span class="k">let</span> <span class="nv">fatTotal</span><span class="p">:</span> <span class="kt">Double</span>

    <span class="kd">@Guide</span><span class="p">(</span><span class="nv">description</span><span class="p">:</span> <span class="s">"Total amount of saturated fat in grams."</span><span class="p">)</span>
    <span class="k">let</span> <span class="nv">fatSaturated</span><span class="p">:</span> <span class="kt">Double</span>

    <span class="kd">@Guide</span><span class="p">(</span><span class="nv">description</span><span class="p">:</span> <span class="s">"Total weight of items in grams."</span><span class="p">)</span>
    <span class="k">let</span> <span class="nv">servingSize</span><span class="p">:</span> <span class="kt">Double</span>

    <span class="kd">@Guide</span><span class="p">(</span><span class="nv">description</span><span class="p">:</span> <span class="s">"Ingredients, separated by commas."</span><span class="p">)</span>
    <span class="k">let</span> <span class="nv">ingredients</span><span class="p">:</span> <span class="kt">String</span><span class="p">?</span>

    <span class="kd">@Guide</span><span class="p">(</span><span class="nv">description</span><span class="p">:</span> <span class="s">"Instructions, separated by newlines."</span><span class="p">)</span>
    <span class="k">let</span> <span class="nv">steps</span><span class="p">:</span> <span class="kt">String</span><span class="p">?</span>
<span class="p">}</span>
</code></pre></div></div>

<p>In order to receive response in a structured format, you have to conform you response type to the <em>Generable</em> protocol. Swift simplifies this task by introducing the <em>Generable</em> macro that we use to annotate our type.</p>

<p>As you can see, the Recipe type is a simple Swift struct that uses the <em>Guide</em> macro. The <em>Guide</em> macro provides additional information to the Foundation Model, so it can understand how to fill that field. The <em>Guide</em> macro receives the description in the natural language similar to prompt. You can be very specific while guiding the Foundation Model to make the response nice.</p>

<p>Structured content generation takes the power of Foundation Models one step further by making the results predictable, reusable, and developer-friendly. With just a few annotations and the right guidance, you can transform raw AI output into strongly-typed Swift models that fit seamlessly into your app. I hope you enjoy the post. Feel free to follow me on <a href="https://twitter.com/mecid">Twitter</a> and ask your questions related to this article. Thanks for reading, and see you next week!</p>]]></content><author><name>Majid Jabrayilov</name><email>cmecid@gmail.com</email></author><category term="Foundation Models" /><summary type="html"><![CDATA[Last week, we talked about the basics of Foundation Models, how to generate text content, and how to tune and control the output. This week, we will talk about simple and yet powerful structured content generation.]]></summary><media:thumbnail xmlns:media="http://search.yahoo.com/mrss/" url="https://swiftwithmajid.com/public/fm.png" /><media:content medium="image" url="https://swiftwithmajid.com/public/fm.png" xmlns:media="http://search.yahoo.com/mrss/" /></entry></feed>