Mastering MapKit in SwiftUI. Basics.
MapKit integration with SwiftUI significantly changed this year. In the previous version of SwiftUI, we had very basic functionality of MKMapView wrapped into the SwiftUI view named Map. Fortunately, things changed, and SwiftUI introduced a new API for MapKit integration. This week, we will learn how to use the new full-featured APIs available in the latest iteration of SwiftUI to integrate with MapKit.
Compare designs, show rulers, add a grid, quick actions for recent builds. Create recordings with touches & audio, trim and export them into MP4 or GIF and share them anywhere using drag & drop. Add bezels to screenshots and videos. Try now
As I said before, in the previous versions of the SwiftUI framework, we had a Map view providing us with basic functionality for MapKit, which is deprecated now. Using the deprecated Map view still makes sense whenever you target previous versions of Apple platforms.
To learn more about the old MapKit integration with SwiftUI, take a look at my dedicated “Using MapKit with SwiftUI” post.
The new MapKit API introduces the MapContentBuilder result builder that looks similar to the ViewBuilder but instead uses the types conforming to the MapContent protocol. Let’s start with the basic example of using the new MapKit APIs in SwiftUI.
import MapKit
import SwiftUI

extension CLLocationCoordinate2D {
    static let newYork: Self = .init(
        latitude: 40.730610,
        longitude: -73.935242
    )

    static let seattle: Self = .init(
        latitude: 47.608013,
        longitude: -122.335167
    )

    static let sanFrancisco: Self = .init(
        latitude: 37.733795,
        longitude: -122.446747
    )
}

struct ContentView: View {
    var body: some View {
        Map {
            Annotation("Seattle", coordinate: .seattle) {
                Image(systemName: "mappin")
                    .foregroundStyle(.black)
                    .padding()
                    .background(.red)
                    .clipShape(Circle())
            }

            Marker(coordinate: .newYork) {
                Label("New York", systemImage: "mappin")
            }

            Marker("San Francisco", monogram: Text("SF"), coordinate: .sanFrancisco)
        }
    }
}
As you can see in the example above, we define the map and place the content on it by using the MapContentBuilder closure. The MapContentBuilder type works with any type conforming to the MapContent protocol.
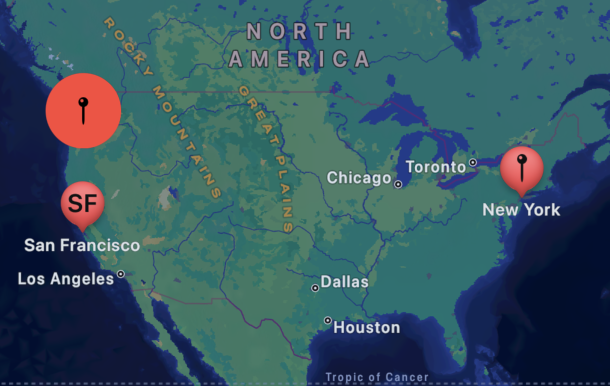
In our example, we use Marker and Annotation types. The Marker is the essential item that allows us to place a predefined pin on the map. The Annotation type is more advanced and will enable us to place a SwiftUI view on the map using the latitude and longitude.
SwiftUI provides us with a bunch of types conforming to the MapContent protocol. We already used two of them: Marker and Annotation. Many of them include MapCircle, MapPolygon, MapPolyline, UserAnnotation, etc.
struct ContentView: View {
    var body: some View {
        Map {
            Annotation("Seattle", coordinate: .seattle) {
                Image(systemName: "mappin")
                    .foregroundStyle(.black)
                    .padding()
                    .background(.red)
                    .clipShape(Circle())
            }

            Marker(coordinate: .newYork) {
                Label("New York", systemImage: "mappin")
            }

            UserAnnotation()
        }
    }
}
You can control the initial position of the map by using another overload of the Map initializer that provides the initialPosition parameter.
struct ContentView: View {
    let initialPosition: MapCameraPosition = .userLocation(
        fallback: .camera(
            MapCamera(centerCoordinate: .newYork, distance: 0)
        )
    )

    var body: some View {
        Map(initialPosition: initialPosition) {
            Annotation("Seattle", coordinate: .seattle) {
                Image(systemName: "mappin")
                    .foregroundStyle(.black)
                    .padding()
                    .background(.red)
                    .clipShape(Circle())
            }

            Marker(coordinate: .newYork) {
                Label("New York", systemImage: "mappin")
            }

            Marker("San Francisco", monogram: Text("SF"), coordinate: .sanFrancisco)
        }
    }
}
The initialPosition parameter takes an instance of the MapCameraPosition type. The MapCameraPosition allows us to define the map position in a few ways. It can be the user location that we use in our example, or you can point it to any area on the map using the camera, region, rect, or item static functions. By default, it uses the automatic instance of the MapCameraPosition type that fits the map content.
Whenever you need constant control over the camera position, you can use another overload of the Map initializer, allowing you to provide two-way binding to the map camera position.
struct ContentView: View {
    @State private var position: MapCameraPosition = .userLocation(
        fallback: .camera(
            MapCamera(centerCoordinate: .newYork, distance: 0)
        )
    )

    var body: some View {
        Map(position: $position) {
            // ...
        }
    }
}
SwiftUI updates the position binding once the user drags the map. It also updates the map camera position as soon as you update the position property programmatically.
struct ContentView: View {
    @State private var position: MapCameraPosition = .userLocation(
        fallback: .camera(
            MapCamera(centerCoordinate: .newYork, distance: 0)
        )
    )

    var body: some View {
        Map(position: $position, interactionModes: .pitch) {
            // ...
        }
    }
}
You can control the types of interactions allowed with the map by using the interactionModes parameters. The MapInteractionModes type defines a set of interactions like pan, pitch, rotate and zoom. By default, it enables all the available interaction types.
Today, we learned the basics of the MapKit integration in SwiftUI. We will continue the topic in the upcoming weeks by covering camera manipulations, map controls, and other advanced topics. I hope you enjoy the post. Feel free to follow me on Twitter and ask your questions related to this post. Thanks for reading, and see you next week!
- Mastering MapKit in SwiftUI. Basics.
- Mastering MapKit in SwiftUI. Customizations.
- Mastering MapKit in SwiftUI. Camera.
- Mastering MapKit in SwiftUI. Interactions.