Building forms with SwiftUI
Today we are going to build a form styled layout with SwiftUI. I want to show you a real-life example of the settings screen built with SwiftUI’s new form view.
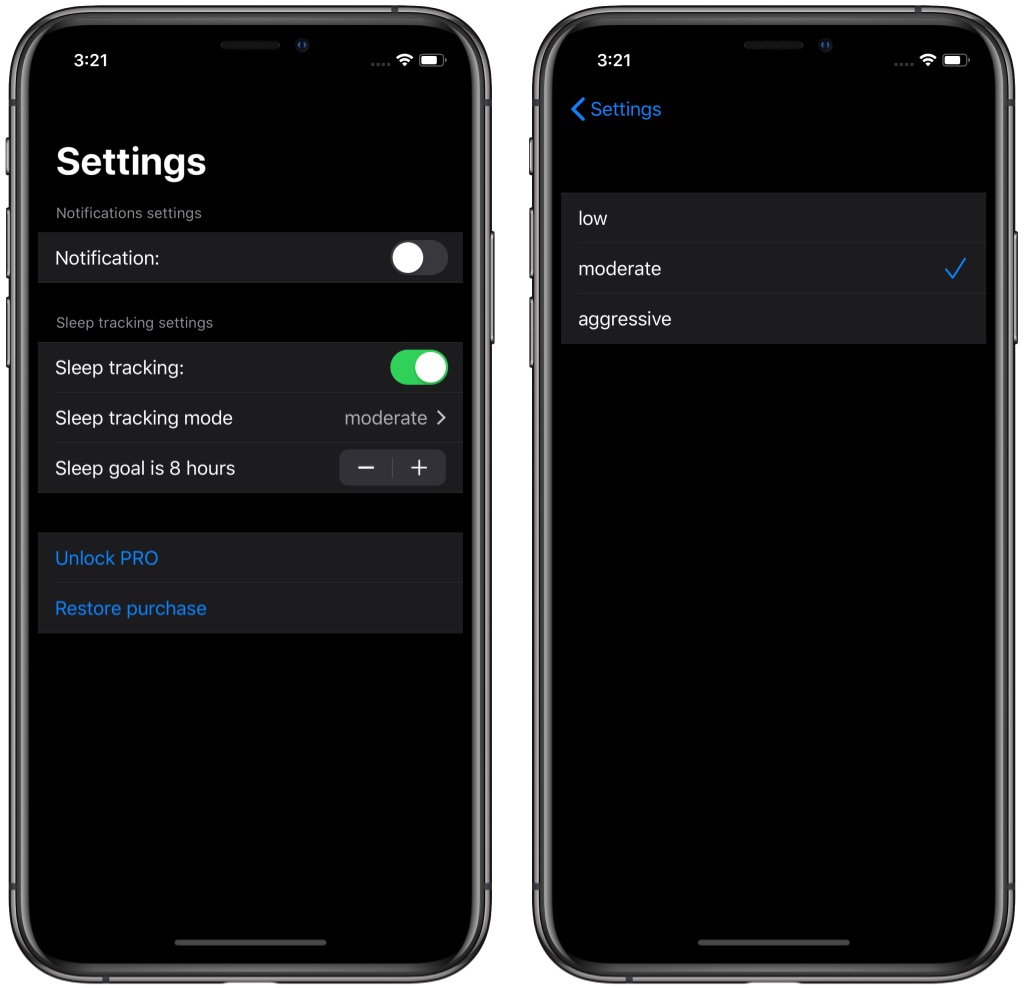
I work on a sleep tracking app, which needs settings screen. Settings screen should contain multiple toggles for enabling and disabling some features, buttons for in-app purchases, and a picker for tuning sleep tracking sensitivity level.
Let’s start building our settings screen. We will use Text, Toggle, Stepper, Picker, and Button components. Here is the source code of our SettingsView.
import SwiftUI

struct SettingsView: View {
    @AppStorage("isNotificationsEnabled")
    private var isNotificationEnabled = true

    @AppStorage("isSleepTrackingEnabled")
    private var isSleepTrackingEnabled = true

    @AppStorage("sleepTrackingMode")
    private var sleepTrackingMode = SleepTrackingMode.moderate.rawValue

    @AppStorage("sleepGoal")
    private var sleepGoal = 8

    var body: some View {
        NavigationView {
            Form {
                Section(header: Text("Notifications settings")) {
                    Toggle(isOn: $isNotificationEnabled) {
                        Text("Notification:")
                    }
                }

                Section(header: Text("Sleep tracking settings")) {
                    Toggle(isOn: $isSleepTrackingEnabled) {
                        Text("Sleep tracking:")
                    }

                    Picker(
                        selection: $sleepTrackingMode,
                        label: Text("Sleep tracking mode")
                    ) {
                        ForEach(SleepTrackingMode.allCases, id: \.self) {
                            Text($0.rawValue).tag($0)
                        }
                    }

                    Stepper(value: $sleepGoal, in: 6...12) {
                        Text("Sleep goal is \(sleepGoal) hours")
                    }
                }

                Section {
                    Button("Unlock PRO") {}
                    Button("Restore purchase") {}
                }
            }
            .navigationBarTitle(Text("Settings"))
        }
    }
}
As you can see we are wrapping our layout code inside the Form component. Form component uses grouped List to present every child inside the cell. By wrapping layout inside the Form, SwiftUI changes the visual appearance for every element. You can simply replace the Form with VStack to check the difference between them. Even Picker looks different.
It also uses a separated screen with List to show the items of Picker. We don’t need to do something, and we have this behavior out of the box. This is where the real power of declarative programming is coming. Every component has different adaptive appearances, which we can easily change by wrapping it into another container. Here is the screenshot of the final result.
Styling
The SwiftUI framework provides us the formStyle view modifier allowing to set one of the three available styles: automatic, grouped and columns. The grouped style uses a grouped list, columns styles uses grid-based layout similar to macOS forms, automatic style uses default form style on the current platform.
struct CustomFormStyle: FormStyle {
    func makeBody(configuration: Configuration) -> some View {
        configuration.content
            .border(Color.red)
    }
}

extension FormStyle where Self == CustomFormStyle {
    static var custom: CustomFormStyle { .init() }
}

struct ContentView: View {
    var body: some View {
        Form {
            // content
        }
        .formStyle(.custom)
    }
}
You can also create your own form style by creating a type conforming to the FormStyle protocol. The only requirement is the makeBody function taking an instance of FormStyleConfiguration as the parameter. You can access the content of the form by reading content property on FormStyleConfiguration type.
Conclusion
I enjoy how easy we can build apps with SwiftUI. You can use Form component for making complex form layouts with a lot of sections and choices for data entry. I hope you love SwiftUI as much as me because I’m going to cover more SwiftUI topics soon. Feel free to follow me on Twitter and ask your questions related to this post. Thanks for reading and see you next week!