The magic of fixed size modifier in SwiftUI
You may have seen some examples of fixed size modifier usage while trying to fix the issue with multiline text in SwiftUI. But do you know what exactly fixed size modifier does? How does it work? Today I want to talk about all the magic and power behind the fixed size modifier.
Compare designs, show rulers, add a grid, quick actions for recent builds. Create recordings with touches & audio, trim and export them into MP4 or GIF and share them anywhere using drag & drop. Add bezels to screenshots and videos. Try now
Basics
SwiftUI documentation says that the fixed size modifier fixes this view at its ideal size. I think the best way to understand how the fixed size modifier works is the visual example. Let’s take a look at a small sample.
struct Example1: View {
    var body: some View {
        Text("Very very very long text!")
            .font(.title)
            .frame(width: 100, height: 100, alignment: .center)
            .border(Color.red)
    }
}
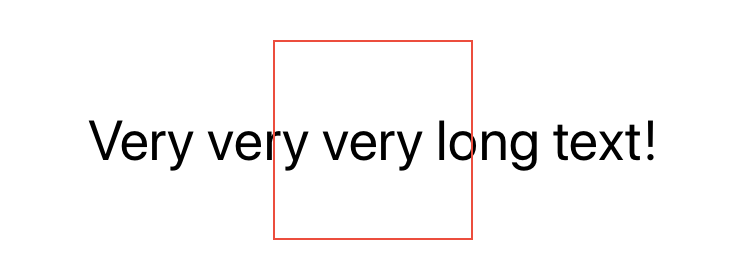
We try to simulate the rendering of very long text. I also use the frame modifier to limit available space. As you can see in the example above, the text doesn’t fit the available space, and the SwiftUI layout system decides to truncate it.

To learn more about the logic behind the layout system of SwiftUI, take a look at my “Layout priorities in SwiftUI” post.
Now let’s take a look at the same example but with the fixed size modifier attached to the text component.
struct Example1: View {
    var body: some View {
        Text("Very very very long text!")
            .font(.title)
            .fixedSize()
            .frame(width: 100, height: 100, alignment: .center)
            .border(Color.red)
    }
}
As you can see in the code sample above, the fixed size modifier allows to text to ignore the frame and use as much space as needed to render the content. The text component simply exceeds the provided frame by continuing the rendering outside of the frame. You can use the clipped modifier after the frame modifier to cut the content inside the provided rectangle.
To learn more about clipping and changing the shape of a view, take a look at my “Customizing the shape of views in SwiftUI” post.
SwiftUI provides us two versions of fixed size modifier. The first one, which we already used in previous examples, doesn’t have any parameters and allows the view to grow both vertically and horizontally. The second variant of the fixed size modifier accepts two boolean parameters. These parameters describe the axis of expansion.
struct Example1: View {
    var body: some View {
        Text("Very very very long text!")
            .font(.title)
            .fixedSize(horizontal: true, vertical: false)
            .frame(width: 100, height: 100, alignment: .center)
            .border(Color.red)
    }
}
Here we use the fixed size modifier to allow the view to expand horizontally. This level of control lets us use the fixed size modifier as an alternative to layout priorities in SwiftUI. Let’s take a look at another example.
struct Example2: View {
    var body: some View {
        HStack {
            Text("Hello World!")
                .font(.headline)
            Text("Hello World!")
                .font(.largeTitle)
            Text("Hello World!")
                .font(.title)
        }.lineLimit(1)
    }
}
In the example above, we have the horizontal stack that contains three text labels. The layout system can’t render all of them without truncating because labels have pretty big font sizes. Assume that we want to display the second label without truncating and allow to SwiftUI cut other labels. We have at least two solutions here. The first one is layout priority, and the second one is the fixed size modifier.
struct Example2: View {
    var body: some View {
        HStack {
            Text("Hello World!")
                .font(.headline)
            Text("Hello World!")
                .font(.largeTitle)
                .fixedSize(horizontal: true, vertical: false)
            Text("Hello World!")
                .font(.title)
        }.lineLimit(1)
    }
}
Conclusion
As you can see, the fixed size modifier provides us much more control over the layout system than layout priorities. Sometimes it can be more beneficial when you need to control the growth of the view in some specific direction. I hope you enjoy the post. Feel free to follow me on Twitter and ask your questions related to this post. Thanks for reading, and see you next week!