Discovering app features with TipKit. Basics.
When I first discovered the title TipKit, I didn’t expect that it would be super helpful for every app I built. TipKit is a new framework that allows you to highlight your app’s features easily. This week, we will learn how to use the TipKit framework to make our app content more discoverable.
Compare designs, show rulers, add a grid, quick actions for recent builds. Create recordings with touches & audio, trim and export them into MP4 or GIF and share them anywhere using drag & drop. Add bezels to screenshots and videos. Try now
Basics
TipKit provides a straightforward foundation for displaying hints in your app. Each hint you wish to display needs to conform to the Tip protocol that TipKit offers, making hint display a breeze.
enum FeedTip: Tip {
    case add
    case favorite
    case remove
    case copy

    var title: Text {
        switch self {
        case .add:
            Text("Add more items.")
        //...
        }
    }
}
As you can see in the example above, we introduce the FeedTip type and conform to the Tip protocol. The only property required for the Tip protocol is the title. Let’s see how we can actually display our tip.
struct FeedView: View {
    let feed: FeedStore

    var body: some View {
        NavigationStack {
            List {
                ForEach(feed.items, id: \.self) { item in
                    Text(verbatim: item)
                }

                Button("Add", systemImage: "plus", action: feed.addItem)
                    .popoverTip(FeedTip.add)
            }
            .navigationTitle("Feed")
        }
    }
}
Here, the FeedView type displays the list of items and the button for adding more items. We use the popoverTip view modifier on a button to display our hint using a popover.
If you try to run the code above, you will not see any hints in your app. The last step to display hints is the TipKit configuration. To set up hints in our apps, we have to call the static function configure on the Tips class.
@main
struct MyApp: App {
    init() {
        try? Tips.configure()
    }

    var body: some Scene {
        WindowGroup {
            ContentView()
        }
    }
}

Finally, we can see our tip on the screen. The TipKit framework provides us not only the popoverTip view modifier but also the TipView that we can use inline.
struct FeedView: View {
    let feed: FeedStore

    var body: some View {
        NavigationStack {
            List {
                TipView(FeedTip.add, arrowEdge: .trailing)

                ForEach(feed.items, id: \.self) { item in
                    Text(verbatim: item)
                }

                Button("Add", systemImage: "plus", action: feed.addItem)
            }
            .navigationTitle("Feed")
        }
    }
}
Customization
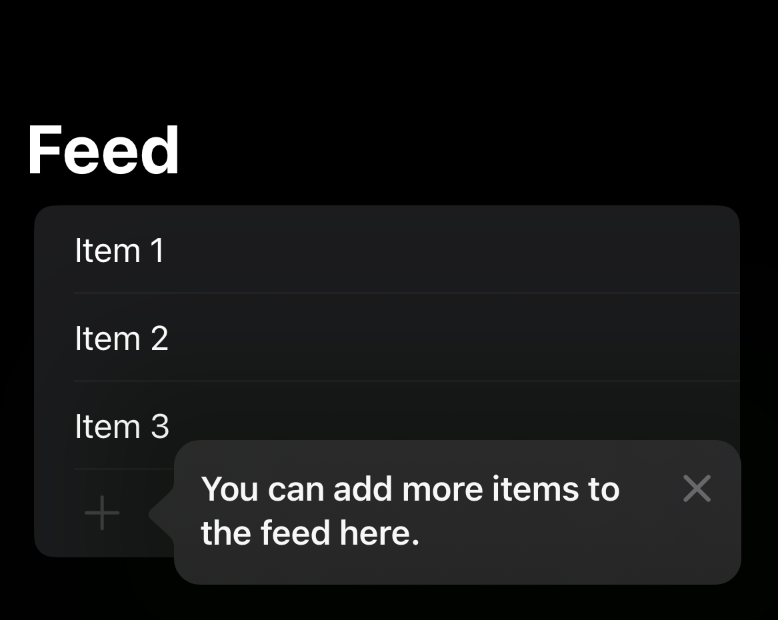
TipView and popoverTip have the same parameters, allowing us to configure the arrow edge and the action handler. Our first implementation of the FeedTip type conforms to the Tip protocol by defining a minimum set of required properties. However, we can extend the functionality by specifying the message, image, and actions per tip.
enum FeedTip: Tip {
    case add
    case favorite
    case remove
    case copy

    var title: Text {
        switch self {
        case .add:
            Text("Add more items.")
        default:
            Text("Some text here")
        }
    }

    var message: Text? {
        switch self {
        case .add:
            Text("You can add more items to the feed here.")
        default:
            nil
        }
    }

    var image: Image? {
        switch self {
        case .add: Image(systemName: "plus")
        default: nil
        }
    }

    var actions: [Action] {
        switch self {
        case .add: [Action(id: "add", title: "Add")]
        default: []
        }
    }
}
As you can see in the example above, we extend the conformance of the Tip protocol and add the image, message, and actions properties. Now, we can use the popoverTip view modifier or TipView to provide an action handler.
struct FeedView: View {
    let feed: FeedStore

    var body: some View {
        NavigationStack {
            List {
                ForEach(feed.items, id: \.self) { item in
                    Text(verbatim: item)
                }

                Button("Add", systemImage: "plus", action: feed.addItem)
                    .popoverTip(FeedTip.add) { action in
                        if action.id == "add" {
                            feed.addItem()
                        }
                    }
            }
            .navigationTitle("Feed")
        }
    }
}
Configuration
The TipKit framework allows us to configure the frequency and the store location for our tips. Frequency configuration gives us flexibility on when to display the tips. For example, you can show them weekly, monthly, or even immediately.
@main
struct MyApp: App {
    init() {
        try? Tips.configure(
            [
                .displayFrequency(.weekly)
            ]
        )
    }

    var body: some Scene {
        WindowGroup {
            ContentView()
        }
    }
}
Store location is used to keep your tips in sync. For example, you can use an app group to keep the watch and iPhone apps in sync. By default, it stores information about tips in user defaults.
@main
struct MyApp: App {
    init() {
        try? Tips.configure(
            [
                .displayFrequency(.immediate),
                .datastoreLocation(.groupContainer(identifier: "com.myapp.group"))
            ]
        )
    }

    var body: some Scene {
        WindowGroup {
            ContentView()
        }
    }
}
UIKit
The TipKit framework is not a SwiftUI-based framework, you can easily use it in your UIKit-based code. It provides us TipUIView, TipUIPopoverViewController, and TipUICollectionViewCell types.
 let tipVC = TipUIPopoverViewController(
    FeedTip.add,
    sourceItem: addButton
)
present(tipVC, animated: animated)
Debugging
TipKit framework also provides us a few functions that might be helpful while testing and debugging tips in our apps.
try? Tips.resetDatastore()

Tips.showTipsForTesting([FeedTip.self])
Tips.showAllTipsForTesting()

Tips.hideTipsForTesting([FeedTip.self])
Tips.hideAllTipsForTesting()
Conclusion
Today, we learned the basics of the TipKit framework. In the following week, I will cover customization points and tip interactions. I hope you enjoy the post. Feel free to follow me on Twitter and ask your questions related to this post. Thanks for reading, and see you next week!