What is new in SwiftUI after WWDC25
The 25th World Wide Developers Conference is here, and it’s the perfect time to explore the most significant changes and additions to the SwiftUI framework. Let’s delve into all the exciting new features Apple has prepared for us this year.
Compare designs, show rulers, add a grid, quick actions for recent builds. Create recordings with touches & audio, trim and export them into MP4 or GIF and share them anywhere using drag & drop. Add bezels to screenshots and videos. Try now
Apple introduced the new design language called Liquid Glass. Thanks to the declarative nature of SwiftUI, we don’t need to modify our code significantly to redesign our apps and apply the new design concept. All you need is to build your app with Xcode 26, and you will get the new design of your app.
Navigation stacks, tabs, inspectors, toolbars, everything is glassy, more rounded, and transparent now. While we may still need to make some adjustments here and there to enhance the user experience, the framework’s default settings are already quite impressive.
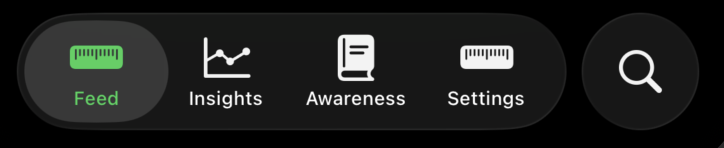
While navigation stacks API didn’t change, the tab navigation provides us with a few new APIs allowing us to improve user experience respecting the new design language. If you still use old TabView APIs, it is a perfect time to refactor your tab navigation. While old APIs also get glassy transformations, the new ones allow us to craft them much better.
    private var tabNavigation: some View {
        TabView {
            Tab("feed", systemImage: "ruler") {
                feedTab
            }

            Tab("insights", systemImage: "chart.xyaxis.line") {
                NavigationStack {
                    InsightsFeatureView()
                        .navigationTitle("insights")
                }
            }

            Tab("awareness", systemImage: "text.book.closed") {
                NavigationStack {
                    AwarenessView()
                        .navigationTitle("awareness")
                }
            }

            Tab("settings", systemImage: "ruler") {
                NavigationStack {
                    SettingsView(settings: settings)
                        .navigationTitle("settings")
                }
            }

            Tab("search", systemImage: "magnifyingglass", role: .search) {
                NavigationStack {
                    SearchFeatureView(store: searchStore)
                }
            }
        }
    }
As you can see in the example above, I use the new Tab API with role to move the search to the bottom of the screen and separate it from other tabs.

Toolbars are also glassy now by default. You can see across the platform that many toolbars are splitted into groups. For this particular case, SwiftUI introduced the new ToolbarSpacer type, allowing us to split toolbars.
    @ToolbarContentBuilder private var toolbar: some ToolbarContent {
        ToolbarItem(placement: .topBarLeading) {
            Button {
                if isPro {
                    sheetShown = .gpt
                } else {
                    unlockPro()
                }
            } label: {
                Label("gpt", systemImage: "sparkles")
            }
            .popoverTip(FeedTip.gpt)
        }

        ToolbarItemGroup(placement: .topBarTrailing) {
            Button("editor", systemImage: "pencil") {
                sheetShown = .editor
            }
            .keyboardShortcut("n")
        }

        ToolbarSpacer(.fixed, placement: .topBarTrailing)

        ToolbarItemGroup(placement: .topBarTrailing) {
            Button(LocalizedStringKey(HKQuantityType.bloodGlucose.identifier), systemImage: "carrot") {
                sheetShown = .bloodGlucose
            }
            .buttonStyle(.glass)

            Button(LocalizedStringKey(HKQuantityType.bodyMass.identifier), systemImage: "scalemass") {
                sheetShown = .bodyMass
            }
        }
    }
Buttons also get the new GlassButtonStyle type that you can set via the buttonStyle view modifier.
Button {
    // action
} label: {
    Label("add", systemImage: "plus")
}
.buttonStyle(.glass)
Whenever you create a custom view that you want to make glassy, there’s a special glassEffect view modifier.
HStack {
   // views
}
.glassEffect()
Besides the new design APIs, we also gain long-awaited attributed string support in the TextEditor view. Another long-awaited feature was WebView that we also have this year.
import WebKit

struct BrowserView: View {
    @State var page = WebPage()

    var body: some View {
        WebView(page)
            .onAppear {
                page.load(URLRequest(url: URL(staticString: "https://google.com")))
            }
    }
}
The new WebView allows us not only load web pages, but also observe them, customize user agent, etc.
This is going to be a huge year for SwiftUI on macOS. As Apple noted there is a huge performance improvement for List and other scrollable views on macOS. Apple also introduced the new Instruments template making profiling your SwiftUI apps much easier.
During next monthes, I will try to dig into new APIs and share with your more detailed overview of them. I hope you enjoy the post. Feel free to follow me on Twitter and ask your questions related to this post. Thanks for reading, and see you next week!