Displaying badges in SwiftUI
One of the many things included in SwiftUI Release 3 was the ability to display badges. SwiftUI Release 3 provides you with the badge view modifier that we can use to generate badges in lists and tabs. This week we will learn how to use the badge view modifier and customize the look and feel of badges.
Compare designs, show rulers, add a grid, quick actions for recent builds. Create recordings with touches & audio, trim and export them into MP4 or GIF and share them anywhere using drag & drop. Add bezels to screenshots and videos. Try now
Basics
The badge view modifier is available only for iOS and macOS. You can use the badge view modifier to generate and display a badge for your view. Keep in mind that only lists and tabs can display badges at the moment. Let’s start with a simple example of the badge view modifier usage.
struct ContentView: View {
    var body: some View {
        List {
            Text("Group 1")
                .badge(12)

            Text("Group 2")
                .badge(20)
        }
    }
}

As you can see in the example above, we use the badge view modifier on the Text view, which is a list item. A list displays the badge on the trailing part of the list item. The badge view modifier also looks great with sidebar styled lists.
To learn more about sidebar styled lists, take a look at my “Mastering List in SwiftUI” post.
The badge view modifier has a few different options. In the previous example, we used the badge view modifier with an integer value. SwiftUI uses the environment to format an integer value in an appropriate locale automatically. SwiftUI also hides the badge whenever the integer value is zero.
There is also an opportunity to use another version of the badge view modifier to display a string or localized string key instead of an integer value.
struct ContentView: View {
    var body: some View {
        TabView {
            Text("Hello World")
                .tabItem {
                    Text("Favorites")
                    Image(systemName: "star")
                }
                .badge(10)
        }
    }
}

Remember that you can use the badge view modifier with tabs, and that’s why you should keep the content of a badge as short as possible. The badge view modifier is one of the many inert view modifiers that SwiftUI provides us, which means you can pass the nil as the value to hide the badge.
struct ContentView: View {
    let count: Int
    var body: some View {
        TabView {
            Text("Hello World")
                .tabItem {
                    Text("Favorites")
                    Image(systemName: "star")
                }
                .badge(count > 0 ? "\(count) stars" : nil)
        }
    }
}
To learn more about tabs in SwiftUI, take a look at my “Tabs and pages in SwiftUI” post.
Customization
Another version of the badge view modifier allows us to pass an instance of the Text view instead of integer or string values. This fantastic opportunity creates tons of customization options available while displaying badges in SwiftUI.
struct ContentView: View {
    var body: some View {
        List {
            Text("Group 1")
                .badge(12)

            Text("Group 2")
                .badge(20)

            Text("Group 3")
                .badge(
                    Text("31 \(Image(systemName: "star"))")
                        .foregroundColor(.red)
                        .font(.headline)
                )
        }
    }
}
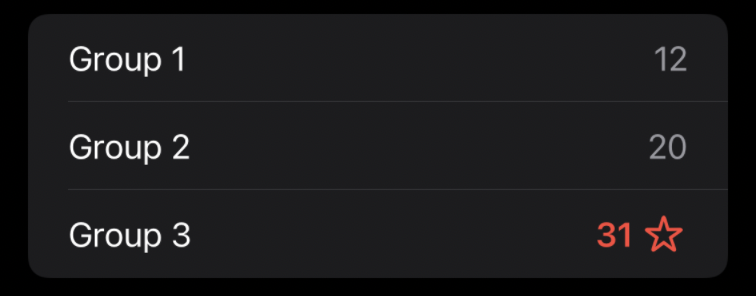
As you can see in the example above, we use the badge view modifier with an instance of the Text view. It allows us to use Text view’s modifiers to tune the badge’s look and feel the way we need. We even can use interpolation to inject the image into the Text view.
Conclusion
This week, we learned how to use the new badge view modifier, a small feature of SwiftUI Release 3 that allows us to badge views effortlessly. I hope you enjoy the post. Feel free to follow me on Twitter and ask your questions related to this post. Thanks for reading, and see you next week!